Order Manager for POS - Webview Plug-in
Overview
What is Live Order Manager for POS?
DoorDash's POS Order Manager enables merchants to manage live orders directly from their POS systems. This streamlined experience enables Merchants to manage live orders from a single screen, reducing their reliance on DoorDash Support and eliminating their need for companion tablets, which in turn boosts staff efficiency.
DoorDash has built a low code solution through which merchants can directly interact with Doordash systems to view, update, and manage their DoorDash orders from their POS devices. It’s best for platforms who are looking to move fast and not adopt (and maintain) multiple solutions such as order adjustment API and order cancellation signals. With the launch of Live Order Manager for POS we have seen a reduction in cancellations of up to 7% relative and a reduction in Missing and Incorrect reports of up to 1.5% relative.
Why Implement Live Order Manager for POS?
Live Order Manager for POS provides POS integrated Merchants with order management features directly to their POS hardware to reduce quality defects and reliance on support. Features include:
- Call customers and Dashers: Our most requested update, Merchants can call customers and Dashers directly from their POS system.
- Rate and block Dashers: Merchants can rate and block Dashers through the POS Order Manager.
- Track Dashers via a live map and view Dasher status: Merchants can see how close Dashers are—without needing a companion tablet—for a more seamless hand-off experience.
- Refund and replace items: Merchants can refund or replace entire items or sub-quantities directly through the POS Order Manager. Modifications are reported back to the POS system to reduce future reconciliation issues.
- Adjust prep time and mark orders as ready for pickup: Merchants can let Dashers know when they need more time to prepare an order or if an order is ready ahead of schedule.
Benefits
For Restaurants:
- Reduce quality defects & reliance on support: Empower operators to self-serve when issues arise, freeing up more time to focus on growing their business
- Fewer “Incorrect Order” reports, Fewer Cancellations: & less time spent on the phone with support
For Providers:
- Build once; get multiple features: DoorDash can add new features as we build them without requiring additional API calls, and provider engineering work
- Low Tech Lift: ~2 weeks development work for partners to implement
For Customers:
- Fewer cancelled orders: -7% reduction in cancellation rate
- Less orders with missing items: -1.5% reduction in Missing and Incorrect orders
Who Should Implement?
- This is ideal for integrations with Merchants that have a screen to display the plugin in-store (can be POS, KDS, supplemental tablet, mobile) to maximize impact of the feature.
- Display doesn’t have to be one-screen only - Live Order Manager can be implemented across multiple screens, but Merchants should have access to display the feature on at least one screen.
- This is particularly ideal for Providers that work with Merchants that have high cancellation rates and/or pain points related to order management, e.g. they want ability to contact Customers and Dashers directly, the ability to adjust prep times, etc.
Feature Requirements
Technical Requirements
- To start integrating with the plugin, you should have either a certified DoorDash Marketplace integration, or be approved by DoorDash to develop a Marketplace integration.
- You need credentials from DoorDash to get started.
- You will need to generate a JWT Auth token.
Implementation Checklist
Step 1: Get the JWT Authentication Key from Doordash and store it securely
- For each provider, you will utilize JWT Authentication. Staging and production each have separate secret keys. Please store these keys securely.
- Set the secret key as a Bearer token in the Authentication header when initializing the webview.
Authorization: Bearer [secret key]
Using the Authentication Key, generate JWTs for requests to Doordash following these steps.
Step 2: Construct and render the URL on your POS device using JWT Auth
Use the url format below to construct the plugin url
https://www.doordash.com/merchant/live-order-management/v2?id=<orderId>
Set the JWT in the Authorization header when initializing the webview.
Authorization: Bearer [Provider JWT]
Refer to sample code below for setting up a webview.
Android webview solution code example
- Initialize the clicking button
posOrderButton = findViewById(R.id.pos_order_bn_1)
posOrderButton.clicksThrottleFirstTwoSecs().subscribe {
   openPOSOrderManagementPage()
}
- Optional: complete clicksThrottleFirstTwoSecs method
fun View.clicksThrottleFirstTwoSecs(): Observable<Unit> {
   return this.clicks().throttleFirst(
       Constants.TWO_SECONDS,
       TimeUnit.SECONDS
   )
}
- Open POS Order Management Webview Page by URL method
private fun openPOSOrderManagementPage() {
// construct the URL
       val url = https://www.doordash.com/merchant/live-order-management?id=<orderId>
       val intent = Intent(context, WebViewActivity::class.java).apply {
           putExtra("url", url)
           putExtra("Authorization",
               "Bearer [secret key provided by Doordash]") // secret key provided by Doordash
       context.startActivity(intent)
   }
}
- Create webViewActivity
class WebViewActivity : BaseActivity(R.layout.web_view) {
// … other implementation
override fun onCreate(savedInstanceState: Bundle?) {
   super.onCreate(savedInstanceState)
   setContentView(R.layout.web_view)
   val url = intent.getStringExtra("url")
   val authHeader = intent.getStringExtra("Authorization")


   // set cookie, we strongly recommend you set the Secret key provided by Doordash in the cookie for our WebView
   val cookieManager = CookieManager.getInstance()
   cookieManager.setAcceptCookie(true)
   if (url != null && !authHeader.isNullOrEmpty()) {
       cookieManager.setCookie(url, "Authorization=$authHeader")
       cookieManager.flush()
   }
   Timber.i("Url: $url")
   // Log.d("cookie", "cookie: ${cookieManager.getCookie(url)}")
   val headers = hashMapOf<String, String>()
   val closeWebViewButton = findViewById<ImageButton>(R.id.closeWebViewButton)
   closeWebViewButton.setOnClickListener {
       finish()
   }
   authHeader?.let {
       headers["Authorization"] = it
   }
   when {
       url.isNullOrEmpty() -> throw NullPointerException("Url can not be null or empty")
       else -> {
           binding.webView.apply {
               settings.javaScriptEnabled = true
               applyWindowInsetsToMargin(top = true, bottom = true)
               webViewClient = webClient
               settings.apply {
             // make sure you enabled JS for webview
                   javaScriptEnabled = true
                   domStorageEnabled = true
               }
           }
           binding.webView.loadUrl(url, headers)
       }
   }
}
// …
}
- web_view.xml example
<?xml version="1.0" encoding="utf-8"?>
<androidx.constraintlayout.widget.ConstraintLayout
   xmlns:android="http://schemas.android.com/apk/res/android"
   xmlns:app="http://schemas.android.com/apk/res-auto"
   android:layout_width="match_parent"
   android:layout_height="match_parent"
   android:background="@color/black">


   <FrameLayout
       android:id="@+id/webViewContainer"
       android:layout_width="800dp"
       android:layout_height="500dp"
       android:layout_margin="2dp"
       android:background="@android:color/black"
       app:layout_constraintTop_toTopOf="parent"
       app:layout_constraintBottom_toBottomOf="parent"
       app:layout_constraintStart_toStartOf="parent"
       app:layout_constraintEnd_toEndOf="parent">


 // Webview content
       <com.doordash.android.core.network.view.DDWebView
           android:id="@+id/web_view"
           android:layout_width="match_parent"
           android:layout_height="match_parent" />


 // Close Button
       <ImageButton
           android:id="@+id/closeWebViewButton"
           android:layout_width="wrap_content"
           android:layout_height="wrap_content"
           android:layout_gravity="end|top"
           android:layout_margin="8dp"
           android:src="@drawable/icon_close" />


   </FrameLayout>
</androidx.constraintlayout.widget.ConstraintLayout>
Recommendations
- It is better to preload behavior when you do binding order modal:
fun bindOrderModel(order: OrderPresentationModel) {
   this.orderModel = order
   preloadWebView(order)
}
- For the preload implementation, make sure that you enabled domStorageEnabled = true for the webview caching
private fun preloadWebView(order: OrderPresentationModel) {
   if (preloadedWebView == null) {
       preloadedWebView = WebView(context).apply {
           settings.apply {
               javaScriptEnabled = true
               domStorageEnabled = true
               cacheMode = WebSettings.LOAD_DEFAULT
           }
       }
   }
   val preloadUrl = buildPreloadUrl(order)
   CookieManager.getInstance().apply {
       setAcceptCookie(true)
       setCookie(preloadUrl, "Authorization=Bearer $AUTHORIZATION_TOKEN")
       flush()
   }
   preloadedWebView?.loadUrl(preloadUrl)
}
- Based on Google's Android Help doc some specific webview versions will face a webview loading slowly issue, make sure that you update to the latest webview version
iOS WebView integration example
1. Set Up the WebView in iOS
In iOS, we will use WKWebView, which is the preferred WebView component for iOS. This provides better performance and security compared to the older UIWebView.
2. Create the WebView Controller
Create a view controller that will contain the WKWebView and handle the passed URL and Authorization header.
WebViewController.swift
import UIKit
import WebKit

class WebViewController: UIViewController {

    var webView: WKWebView!
    var url: String?
    var authHeader: String?

    override func viewDidLoad() {
        super.viewDidLoad()

        // Create WebView
        let webConfiguration = WKWebViewConfiguration()
        webView = WKWebView(frame: .zero, configuration: webConfiguration)
        webView.translatesAutoresizingMaskIntoConstraints = false
        self.view.addSubview(webView)

        // Set WebView constraints
        NSLayoutConstraint.activate([
            webView.topAnchor.constraint(equalTo: self.view.topAnchor),
            webView.bottomAnchor.constraint(equalTo: self.view.bottomAnchor),
            webView.leadingAnchor.constraint(equalTo: self.view.leadingAnchor),
            webView.trailingAnchor.constraint(equalTo: self.view.trailingAnchor)
        ])

        // Load URL
        if let urlString = url, let requestUrl = URL(string: urlString) {
            var request = URLRequest(url: requestUrl)
            // Add Authorization header
            if let token = authHeader {
                request.setValue("Bearer \(token)", forHTTPHeaderField: "Authorization")
            }
            webView.load(request)
        }

        // Optional close button
        let closeButton = UIButton(type: .close)
        closeButton.translatesAutoresizingMaskIntoConstraints = false
        closeButton.addTarget(self, action: #selector(closeWebView), for: .touchUpInside)
        self.view.addSubview(closeButton)

        // Set close button constraints
        NSLayoutConstraint.activate([
            closeButton.topAnchor.constraint(equalTo: self.view.safeAreaLayoutGuide.topAnchor, constant: 8),
            closeButton.trailingAnchor.constraint(equalTo: self.view.safeAreaLayoutGuide.trailingAnchor, constant: -8)
        ])
    }

    // Close WebView
    @objc func closeWebView() {
        self.dismiss(animated: true, completion: nil)
    }
}
3. Open WebView from Another View Controller
Next, you need to open the WebViewController from another view controller, passing the Authorization header and the target URL.
MainViewController.swift
import UIKit

class MainViewController: UIViewController {

    var storeId: String = "12345"  // Example StoreId obtained from some source
    var orderId: String = "B2C1C780"  // Example OrderId obtained from some source
    var jwtToken: String = "your_jwt_token_here"  // Example JWT Token obtained from some source

    override func viewDidLoad() {
        super.viewDidLoad()

        // Example button to open the WebView
        let openWebViewButton = UIButton(type: .system)
        openWebViewButton.setTitle("Open POS Order Management", for: .normal)
        openWebViewButton.addTarget(self, action: #selector(openWebView), for: .touchUpInside)
        openWebViewButton.frame = CGRect(x: 100, y: 100, width: 200, height: 50)
        self.view.addSubview(openWebViewButton)
    }

    @objc func openWebView() {
        // Construct URL
        let urlString = "https://www.doordash.com/merchant/live-order-management/v2?id=\(orderId)"

        // Create WebViewController instance and pass parameters
        let webViewController = WebViewController()
        webViewController.url = urlString
        webViewController.authHeader = jwtToken

        // Present WebViewController
        self.present(webViewController, animated: true, completion: nil)
    }
}
4. Preloading WebView (optional)
You can preload the WebView to optimize user experience, especially if the content will be loaded frequently. Here’s an example of how to preload the WebView:
private func preloadWebView(order: OrderPresentationModel) {
    if preloadedWebView == nil {
        preloadedWebView = WKWebView(frame: .zero)
        preloadedWebView?.configuration.preferences.javaScriptEnabled = true
        preloadedWebView?.configuration.websiteDataStore = WKWebsiteDataStore.default()
    }
    let preloadUrl = buildPreloadUrl(order)
    if let preloadWebView = preloadedWebView {
        preloadWebView.load(URLRequest(url: preloadUrl))
    }
}
5. WebView Settings & Optimization
Ensure JavaScript is enabled and caching is properly configured for better performance:
let webConfiguration = WKWebViewConfiguration()
let webView = WKWebView(frame: .zero, configuration: webConfiguration)
webView.configuration.preferences.javaScriptEnabled = true
webView.configuration.websiteDataStore = WKWebsiteDataStore.default()
6. Closing WebView
To provide a seamless user experience, a close button allows users to dismiss the WebView and return to the previous screen.
7. Conclusion
By using WKWebView in iOS, you can implement a WebView that mirrors the functionality of the Android WebView. The main steps involve setting up a WKWebView to load a URL with the Authorization header, passing the JWT token securely, and providing options for preloading and caching. With these steps, you can ensure seamless integration of the POS Order Management WebView in your iOS application.
Web Iframe integration example
This guide details the process for POS Providers to integrate and display DoorDash’s POS Plugin using an iFrame. By following these steps, providers can seamlessly embed the Live Order Management system into their platform.
1. Generate a JWT Token
To authenticate and securely access the POS Plugin, a JSON Web Token (JWT) must be generated.
How to Generate a JWT Token Refer to the authentication guide: Authenticate to the API: JWTs
Ensure the JWT includes the following claims:
- iss (Issuer): Your developer ID
- kid (Key ID): The API key linked to your account
- exp (Expiration): Token expiration timestamp
- iat (Issued At): Token creation timestamp
- Any additional claims required for your integration
This JWT will be used in the next step to securely access the POS Plugin.
2. Load teh POS Plugin in an iFrame
Once the JWT token is generated, use the following URL format to embed the POS Plugin in an iFrame:
iFrame URL Format
https://www.doordash.com/merchant/live-order-management/v2?id=${deliveryUUID}#t={JWT_TOKEN_STRING}
Parameters
- deliveryUUID: Unique identifier for the delivery/order being managed
- JWT_TOKEN_STRING: JWT token generated in Step 1
Example iFrame code
<iframe
  src="https://www.doordash.com/merchant/live-order-management/v2?id=12345#t=eyJhbGciOiJIUzI1NiIs..."
  width="100%"
  height="600px"
  frameborder="0"
  allowfullscreen>
</iframe>
Additional Considerations
- Security: Ensure JWT tokens are securely generated and have an appropriate expiration timeframe.
- Cross-Origin Embedding: If issues arise when embedding the iFrame, confirm that the parent page permits external content.
- Error Handling: If the iFrame does not load, verify the JWT token’s validity and the correctness of the deliveryUUID parameter.
By following these steps, POS Providers can integrate the DoorDash POS Plugin via iFrame, enabling a seamless order management experience for merchants.
Note: For security purposes, we require a list of domains that will integrate the WebView in an iFrame. These domains will be added to an allowlist to prevent cross-origin issues
Receiving order adjustment notifications via Order Adjustment webhook
Providers can receive notifications for order adjustments made via POS-plugin by subscribing to our Order Adjustment webhook. This webhook payload includes complete order payload along with the delta on specific items adjusted. Please follow below steps to set up the webhook.
Sample format of order-adjustment webhook:
{
{
  "event": {
    "type": "OrderAdjustment",
    "event_timestamp": "2024-05-06T19:50:43+00:00"
  },
  "order": {
    "id": "dc268e73-824a-4a23-8730-02c41eb6393a",
    "store_order_cart_id": "2000005000762452",
    "tax": 68,
    "subtotal": 1080,
    "estimated_pickup_time": "2024-05-06T19:50:43+00:00",
    "is_pickup": false,
    "order_special_instructions": "",
    "delivery_address": "REDACTED",
    "consumer": {
      "id": "REDACTED",
      "first_name": "REDACTED",
      "last_name": "REDACTED",
      "email": "REDACTED",
      "phone": "REDACTED"
    },
    "store": {
      "merchant_supplied_id": "3944",
      "provider_type": "crisp",
      "timezone": "US/Central",
      "store_business": {
        "auto_release_enabled": false
      },
      "id": "24913498"
    },
    "categories": [
      {
        "merchant_supplied_id": "c_1255",
        "name": "Sodas",
        "items": [
          {
            "name": "Unlucky Ducky",
            "quantity": 1,
            "price": 280,
            "merchant_supplied_id": "p_1553",
            "consumer_name": "Alec",
            "extras": [
              {
                "merchant_supplied_id": "m_4343",
                "name": "Splashes",
                "options": [
                  {
                    "name": "Mountain Dew Splash",
                    "quantity": 1,
                    "price": 0,
                    "merchant_supplied_id": "m_4491",
                    "extras": [],
                    "line_option_id": "eb050156-832d-4e30-ba05-285ba0ad0065"
                  }
                ]
              }
             ]
      }
]
    ],
    "delivery_short_code": "2ff901b3",
    "tax_transaction_id": "",
    "is_demand_gen": false,
    "commission_type": "regular",
    "is_tax_remitted_by_doordash": false,
    "tax_amount_remitted_by_doordash": 0,
    "fulfillment_type": "dx_delivery",
    "merchant_tip_amount": 0,
    "experience": "DOORDASH"
  },
  "order_adjustment_metadata" : {
  "adjustment_source" : "MERCHANT",
  "adjustment_timestamp" : "2024-05-06T19:50:43+00:00"
  "adjusted_order_items" : [
    {
      "line_item_id": "94b653e4-e394-4330-a714-43e764aergjn",
      "adjustment_type": "ITEM_UPDATE",
      "quantity": 2,
      "substituted_item": { }
    },
    {
      "line_item_id": "94b653e4-e394-4330-a714-43e764a223",
      "adjustment_type": "ITEM_REMOVE",
      "substituted_item": { },
      "options": [ ]
    },
    {
      "line_item_id": "94b653e4-e394-4330-a714-43e764ab113",
      "adjustment_type": "ITEM_SUBSTITUTE",
      "substituted_item": {
        "name": "Diet Coke",
        "merchant_supplied_id": "179",
        "price": 2,
        "quantity": 1
      }
    }
  ]
}
}

}
Step 1: Configure order adjustment webhook via the Developer portal for your provider.
Login to the developer portal and go to Webhook Subscription page to set this up. This set up is similar to setting up any other webhooks you currently have.
Step 2: Make order adjustments via open-api or pos-plugin to test the webhook integration
You can adjust test orders either via the API or the plugin to test. You can also verify webhooks being received via Developer Portal event logs here.
Testing and validation
- Create a Test Order on one of your Developer Portal Test Stores
- Click the button in your UI that will open the POS Webview app

- A webView window will pop up after clicking the button

- Done and ready for merchants to manage DoorDash orders on your device!
User Flow Recommendations
Intended Users:
- Restaurant staff managers and non-managerial store operators
- Scenarios where the feature will be most valuable:
- Example: Merchant runs out of x item and needs to substitute it on a given order → Merchant can use Order Manager to mark items out of stock and substitute items on live orders
- Example: Dashers are arriving too early / late → Merchant can use Order Manager to adjust prep times and monitor Dasher arrivals at the order level
- Example: Merchant forgot to give the Dasher x item → Merchant can use Order Manager to communicate directly with the Dasher
Optimal User Experience:
Order Manager should be displayed on one or more active screens in the store (can be POS, KDS, supplemental tablet, mobile app).
We see up to 10x more impact when the Order Manager is accessible by store operators with one click vs operators having to take several actions to access the feature.
This feature shouldn’t be buried in the UI.
This feature should be easy to use in POS/system readily available to in-store operators without too many steps or disruptions to existing operations workflows.
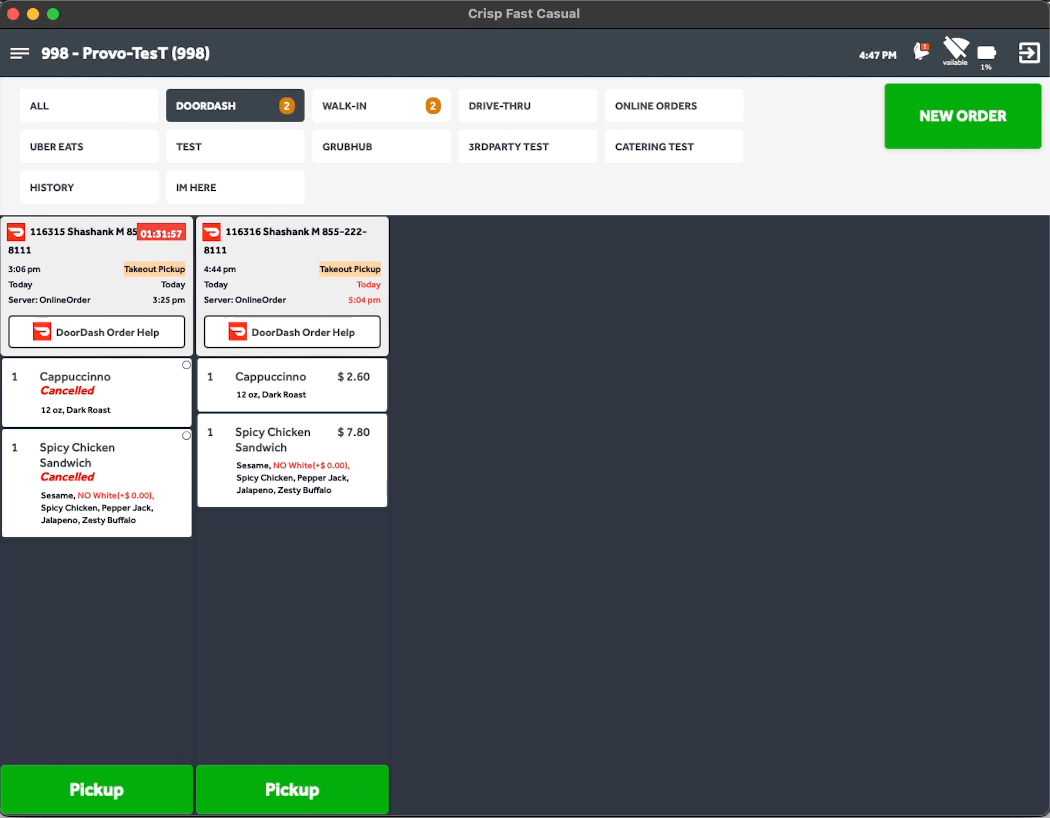 Sample User Experience
Error Handling for Users:
- Utilize messaging that resembles “Order Manager is unavailable at this time. Please reach out to support to update this order.”
Feature Rollout and Announcement
Best Practices for Announcing the Feature
- Recommend timing announcements 1 week prior to go-live date
- What to include in an announcement
- Overview: Brief description of Order Manager for POS, include screenshots and links as available (Example: DoorDash's POS Order Manager enables merchants to manage live orders directly from their POS systems. This streamlined experience enables Merchants to manage live orders from a single screen, reducing their reliance on DoorDash Support and eliminating their need for companion tablets, which in turn boosts staff efficiency.)
- Why use Order Manager for POS: Details on the benefit of using Order Manager for POS
- Get started with Order Manager for POS: Details on how Merchants can access the feature from their POS system
- Additional Resources / Guidance: Include FAQs and details on how Merchants can contact support to troubleshoot
Documentation and Resources for Restaurants:
- Share this help article with Merchants to increase adoption.
FAQ
- What features does the DoorDash POS Webview Integration offer?
- Call customers and Dashers: Our most requested update, Merchants can call customers and Dashers directly from their POS system.
- Rate and block Dashers: Merchants can rate and block Dashers through the POS Order Manager.
- Track Dashers via a live map and view Dasher status: Merchants can see how close Dashers are—without needing a companion tablet—for a more seamless hand-off experience.
- Refund and replace items: Merchants can refund or replace entire items or sub-quantities directly through the POS Order Manager. Modifications are reported back to the POS system to reduce future reconciliation issues.
- Adjust prep time and mark orders as ready for pickup: Merchants can let Dashers know when they need more time to prepare an order or if an order is ready ahead of schedule.
- Are there any best practices for optimizing performance during integration?
- The feature is most helpful when it can be easily accessed by restaurants. It should be displayed on a hub or screen that shows all orders. We recommend a CTA button to open webview for each order on that hub (i.e. one-click access)
- Can a merchant cancel the order within the webview?
- Cancels are not supported within the Webview at this time
- What are the prerequisites for integrating with the DoorDash POS Webview?
- You need to be a Provider on DoorDash
- You will need to get secret keys from Doordash
- How does DoorDash push new features to the POS Webview Integration?
- DoorDash can release new features with over-the-air updates that do not require incremental development from your team, saving you time that you can invest elsewhere
- Can I generate my JWT Auth for the plugin using Developer Portal?
- No, currently, you will need to reach out to support to receive credentials specific for the plugin. This will be available in the Developer Portal soon.
If you cannot find the answer to your question in our FAQ please reach out to Developer Portal Support.