Menu Configuration Reference
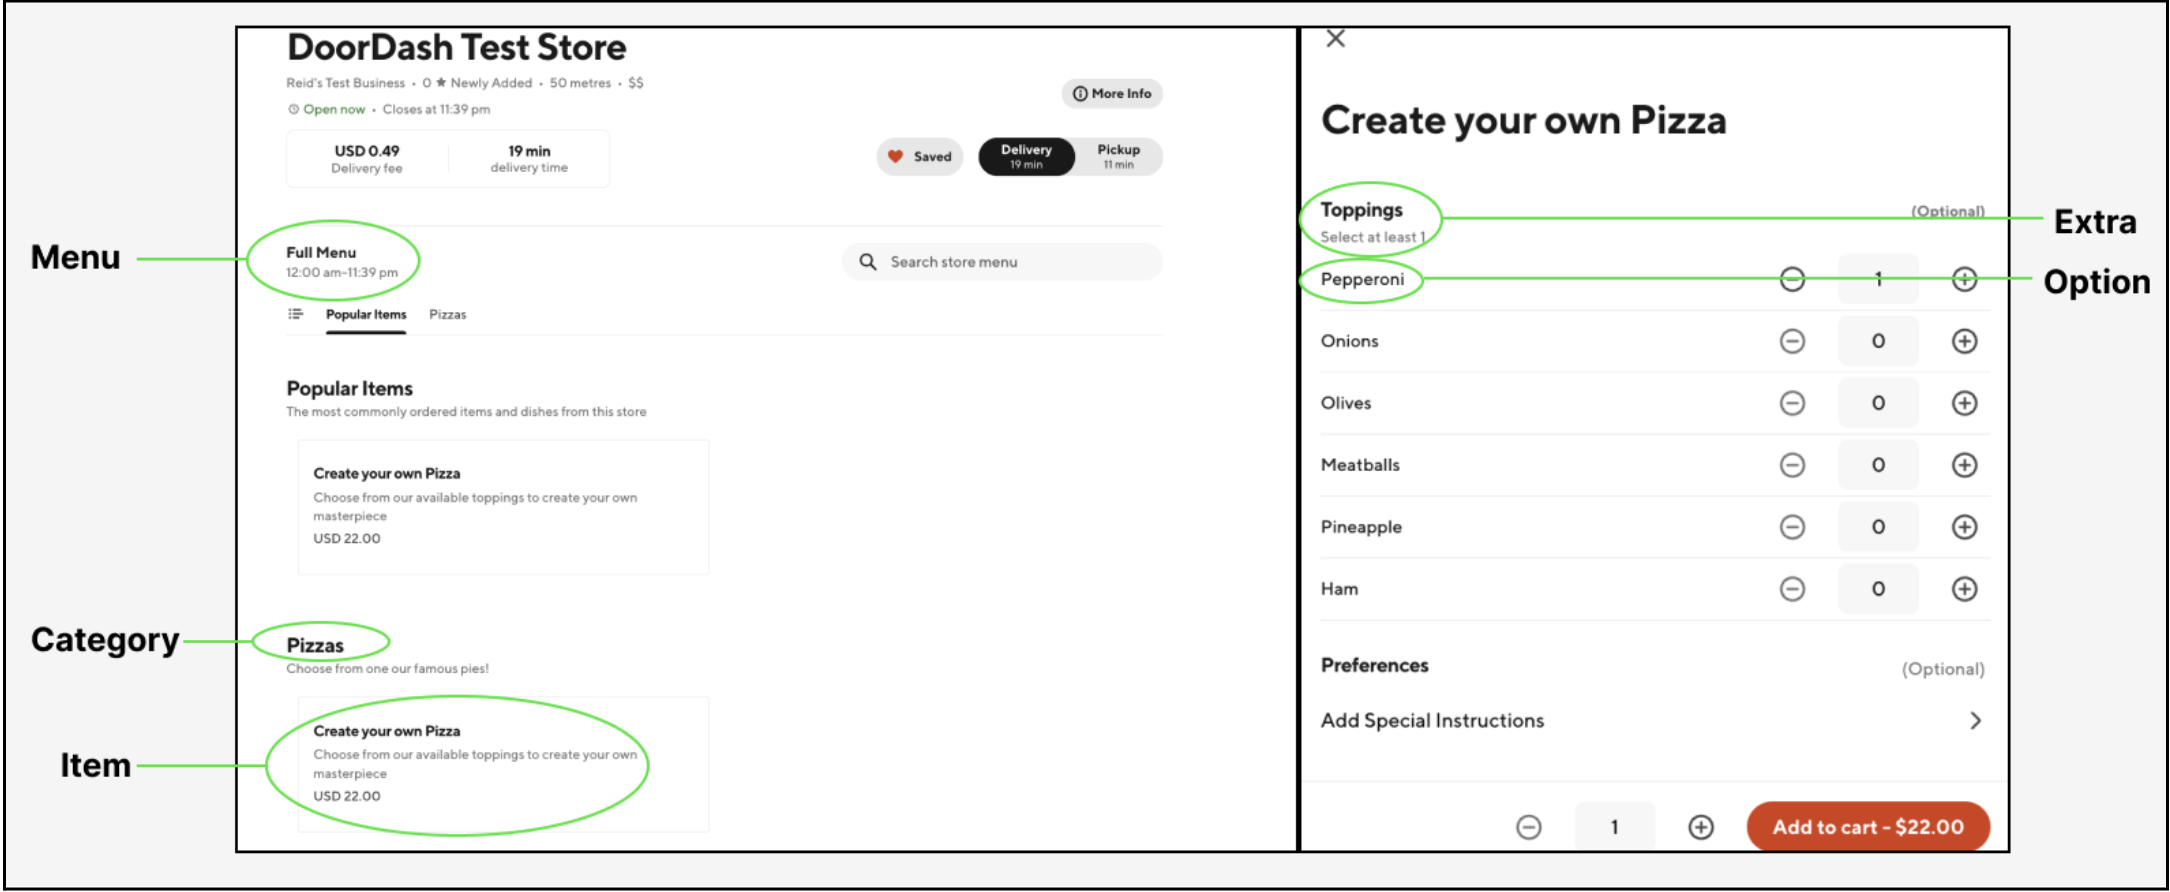
Menu Structure
DoorDash menus have a hierarchical structure that is comprised of the following levels:
- Menu
- Categories
- Items
- Extras
- Options
Menu Level
-
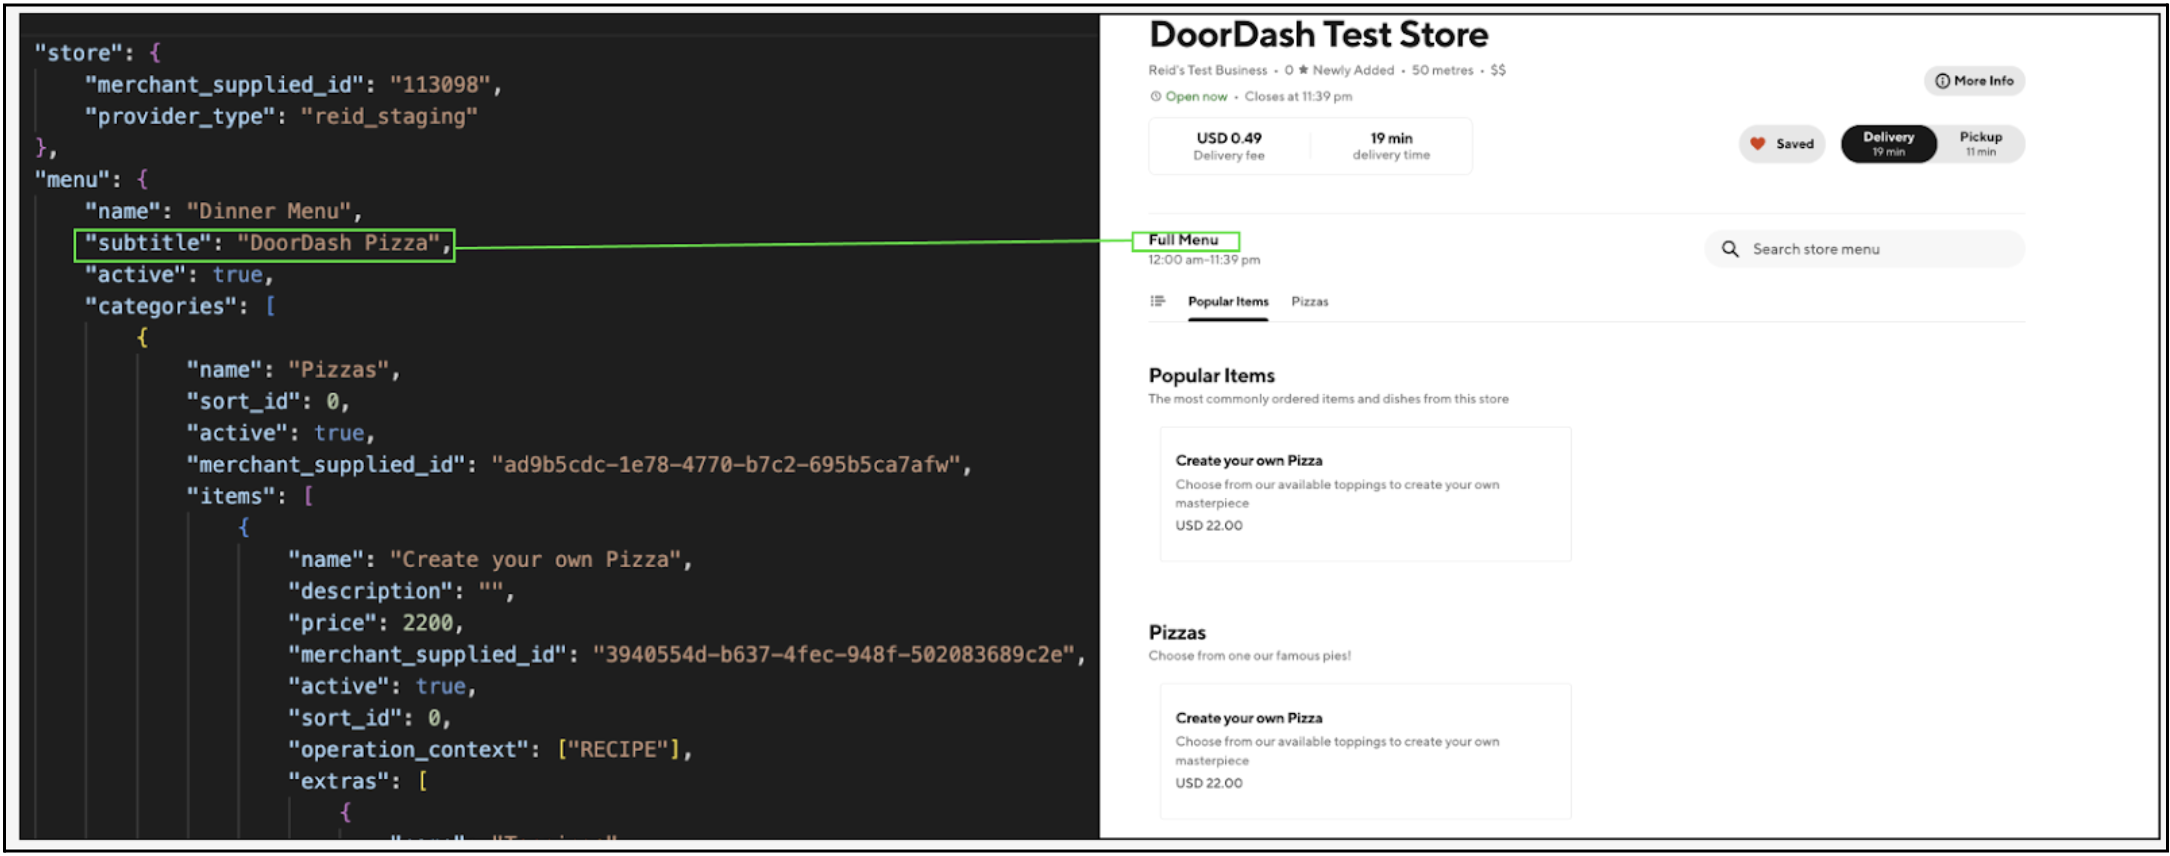
menu.name(required) - internal name of the menu, not shown externally -
menu.subtitle- external name of the menu- This is only shown if multiple active menus exists for the store, otherwise external name is shown as "Full Menu"
-
menu.active- controls whether the menu is active or not, iffalsethe menu will be unavailable on Marketplace- If no active menus exist for the store, Consumers will be unable to navigate to it without being redirected to the DD home page.
Hours
Store Open Hours
store_open_hours.start_time- local start time for when orders can successfully be placedstore_open_hours.end_time- local end time for when orders can successfully be placedstore_open_hours.day_index- day of week for specified hours
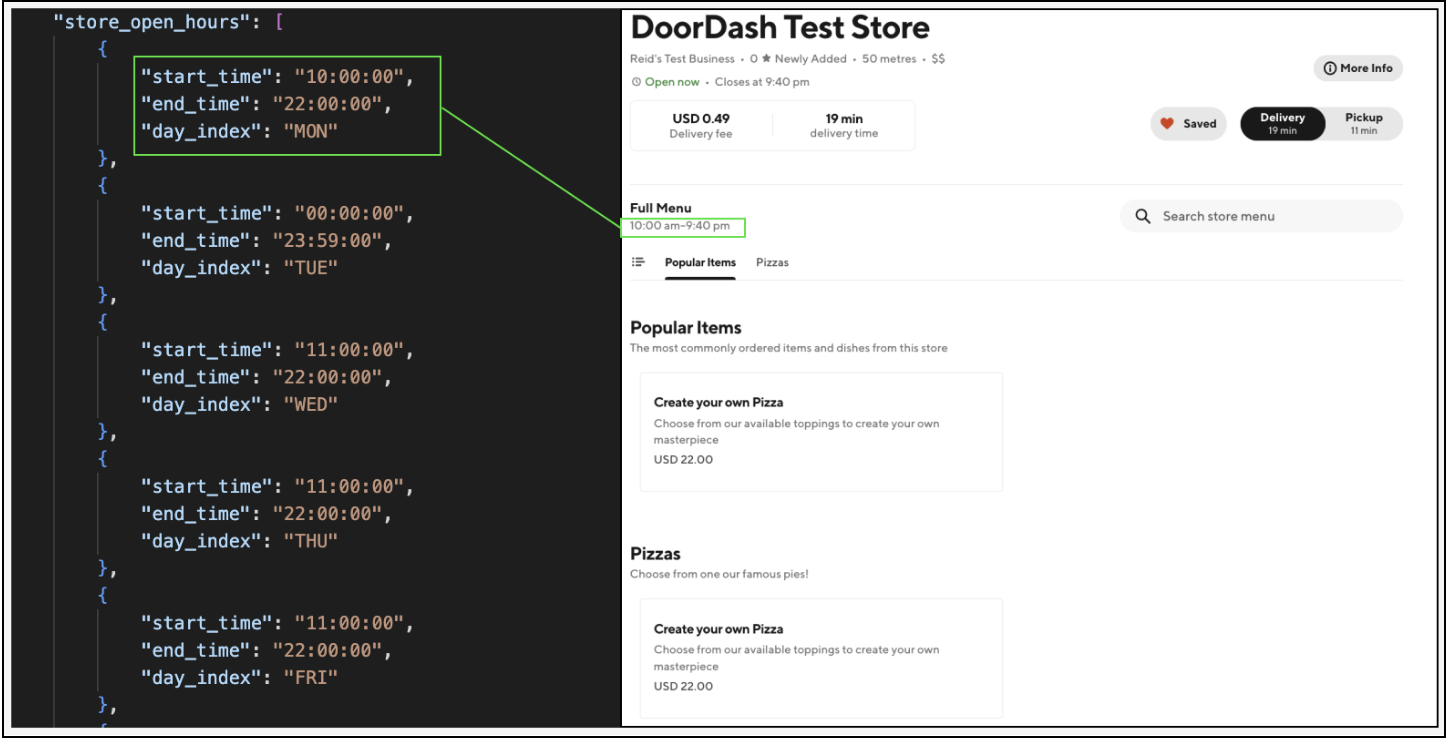
Considerations when setting hours:
-
DoorDash deducts 20 minutes from
store_open_hours.end_timeto determine the true ordering hours for our Marketplace.- This is done to give our Dashers ample time to pick up the order before the restaurant closes.
-
To display hours as ‘All Day’ on Marketplace, set hours to the following:
"start_time": "00:00:00"
"end_time": "23:59:59"
- If
store_open_hours.end_timeis less thanstore_open_hours.start_time, this is interpreted as hours that extend into the next day.- As an example, the below would translate to the store being open from 8:00am to 1:40am:
"start_time": "08:00:00"
"end_time": "02:00:00"
- Hours for a single menu cannot have separate specified hour periods that overlap.
- As an example, these hours below would be considered invalid:
{
    "day_index": "FRI",
    "start_time": "08:00:00",
    "end_time": "02:00:00"
},
{
    "day_index": "SAT",
    "start_time": "01:00:00",
    "end_time": "22:00:00"
}
Store Special Hours
Store Special Hours can be used to specify operating hours for a distinct date that differ from your typical hours. You may use special hours to either close, shorten, of extend operating hours.
store_special_hours.start_time- local start time for when orders can successfully be placedstore_special_hours.end_time- local end time for when orders can successfully be placedstore_special_hours.date- discrete date of when special hours will be enforcedstore_special_hours.closed- boolean indicating whether store is closed or not on this date
Because Store Special Hours are date specific, if you wish you specify interday special hours, separate dates must be used:
"special_hours":
[
   {
       "date": "2022-11-24",
       "closed": false,
       "start_time": "12:00:00",
       "end_time": "23:59:59"
   },
   {
       "date": "2022-11-25",
       "closed": false,
       "start_time": "00:00:00",
       "end_time": "00:30:00"
   }
]
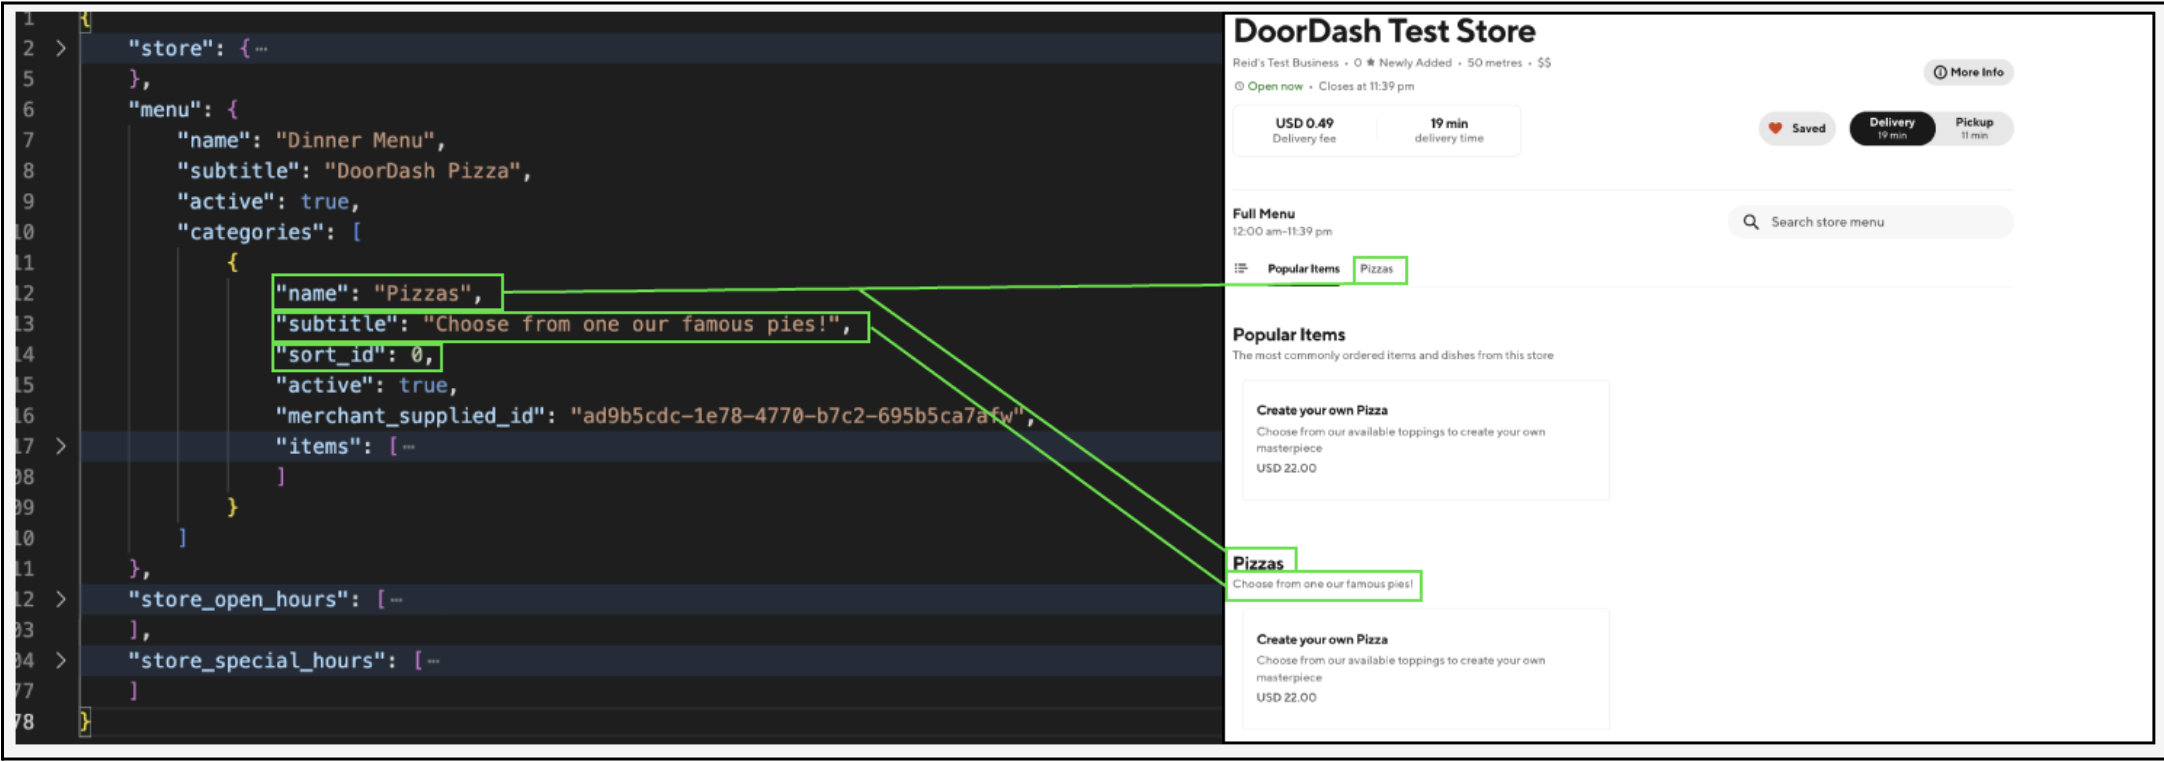
Category Level
category.name(required)category.subtitlecategory.sort_id- dictates category sort order, DoorDash sorts categories based in ascending order by referencing this field (i.e. sort_id does not have to be 0 in order for category to be sorted to the top)category.active- iffalse, the entire category will be hidden from the menu- If a category has no active items within it, it will also be hidden from the menu
DoorDash auto-adds a "Popular Items" category that is generated based on the top 10 most popular items for the store.
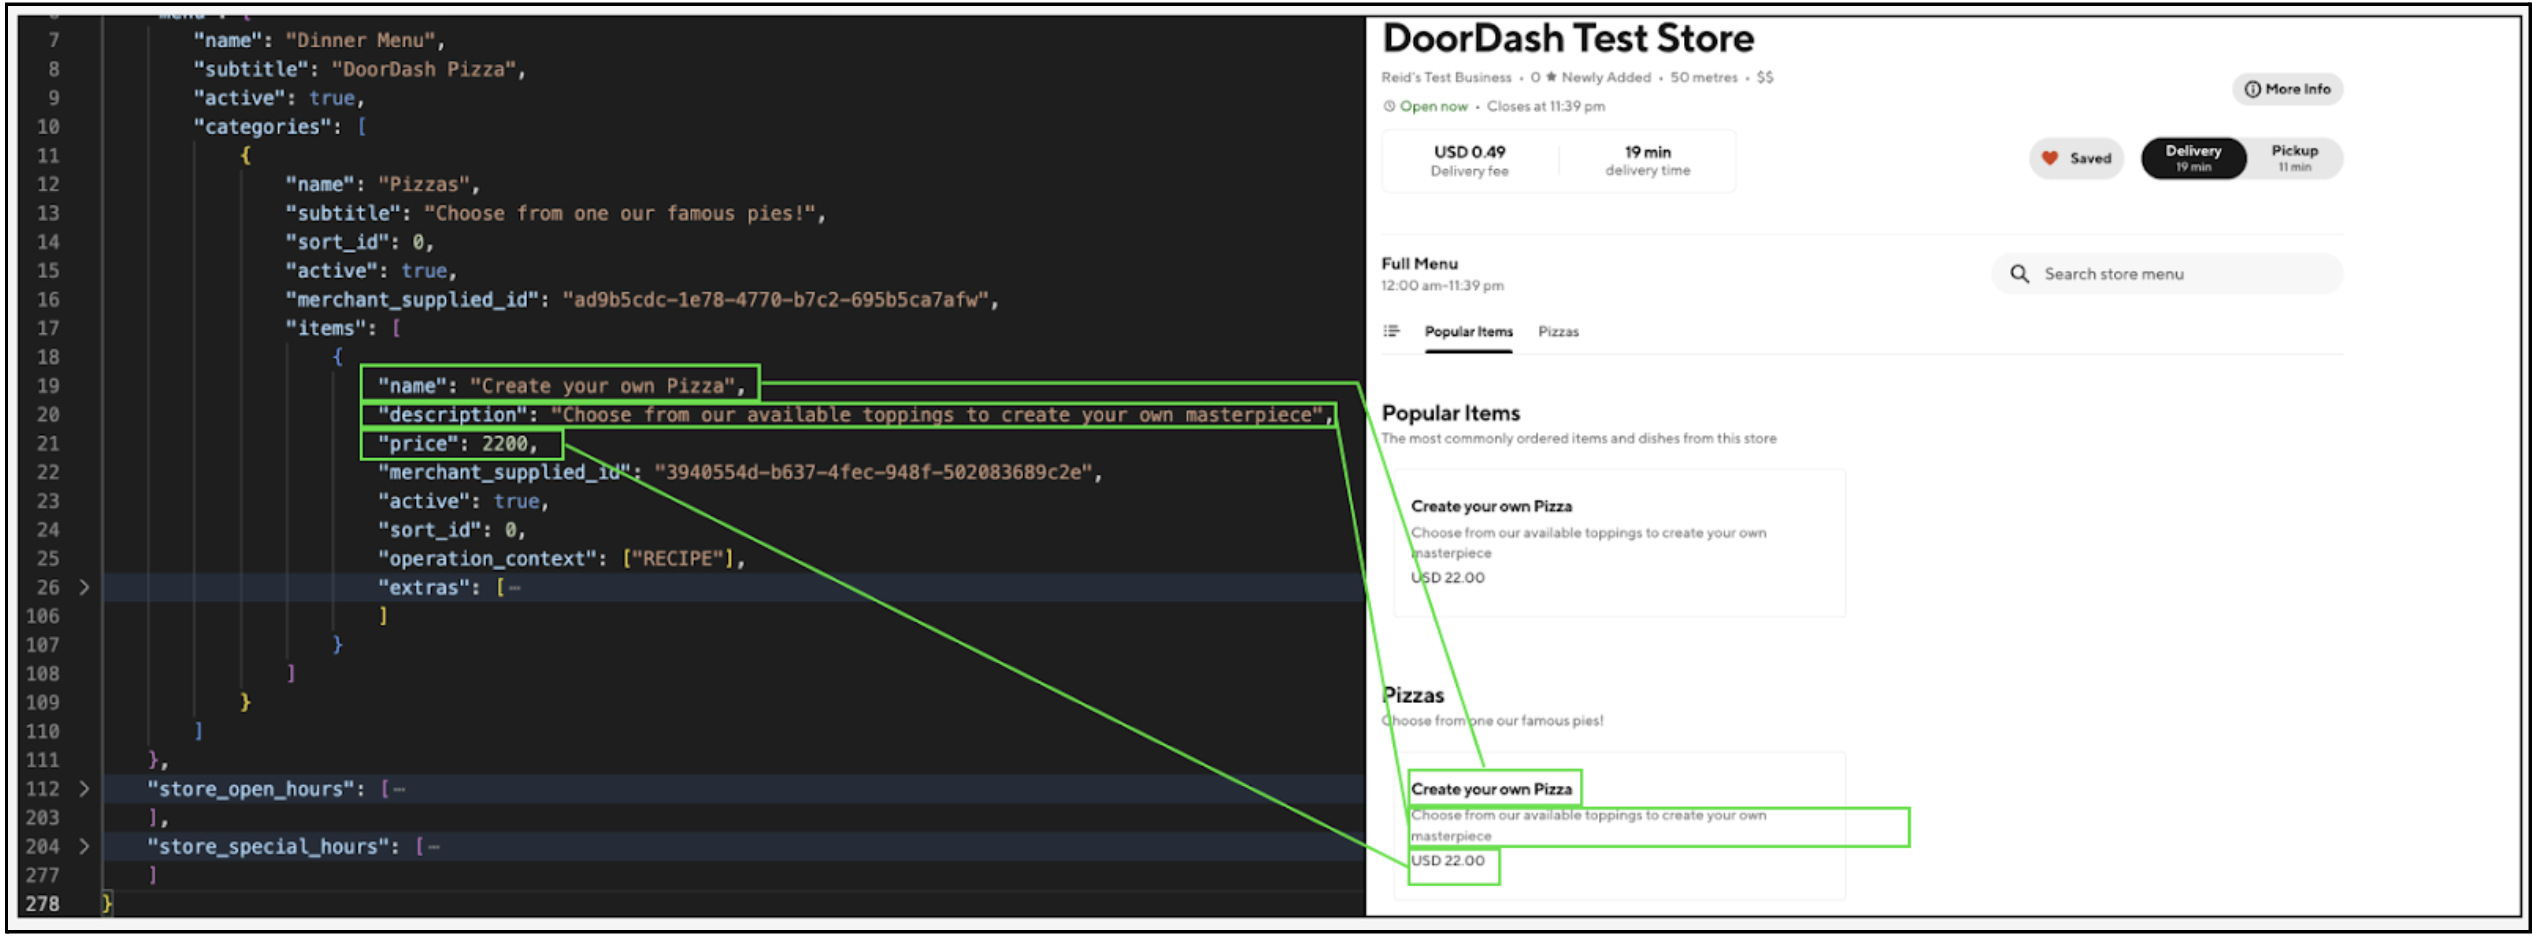
Item Level
item.name(required)item.descriptionitem.price(required) - delivery price measured in cents, not shown at the menu level if theitem.price: 0item.base_price- pick up measured in cents, not shown at the menu level if theitem.base_price: 0item.sort_id- since June 2022, this is no longer being used by Cx eng to determine item sort order within categories. All items are now sorted within categories based on item popularityitem.active- if false, the item will be hidden from the menu- This is different from
item.is_suspended, which is set via item activation/deactivation webhooks rather than menu updates. - both
item.active: trueanditem.is_suspended: falsefor an item to show on the menu
- This is different from
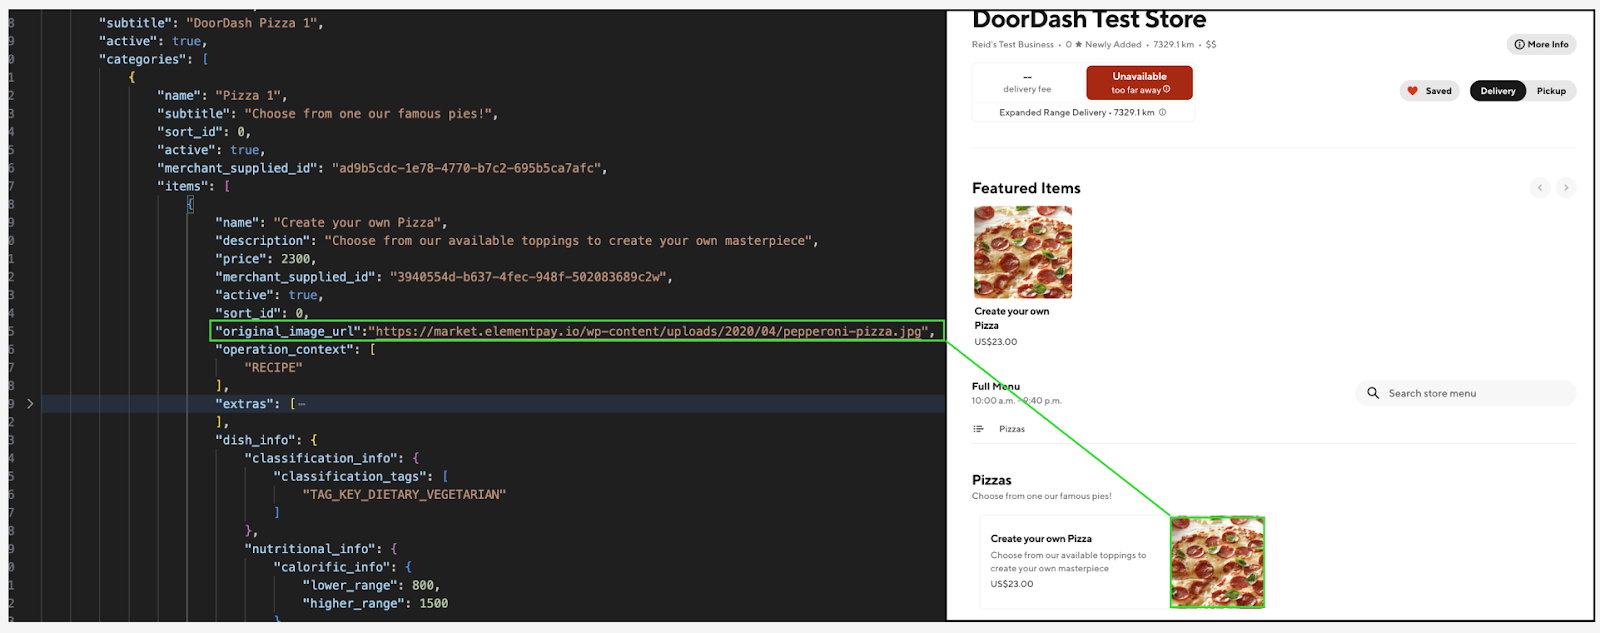
Item Images
item.original_image_url- Item image URL in JPG | JPEG | PNG format, min resolution 1400w x 800h, aspect ratio 16:9 and max size 2MB.- Image must be accessible for download by DD from the specified URL.
- Once received, images must be first approved by Photo-Service before the photos are shown on the menu.
- Images are currently auto-cropped to meet the expected dimensions. To avoid mis-cropping, please have the Mx provide images that meet the expected aspect ratio.
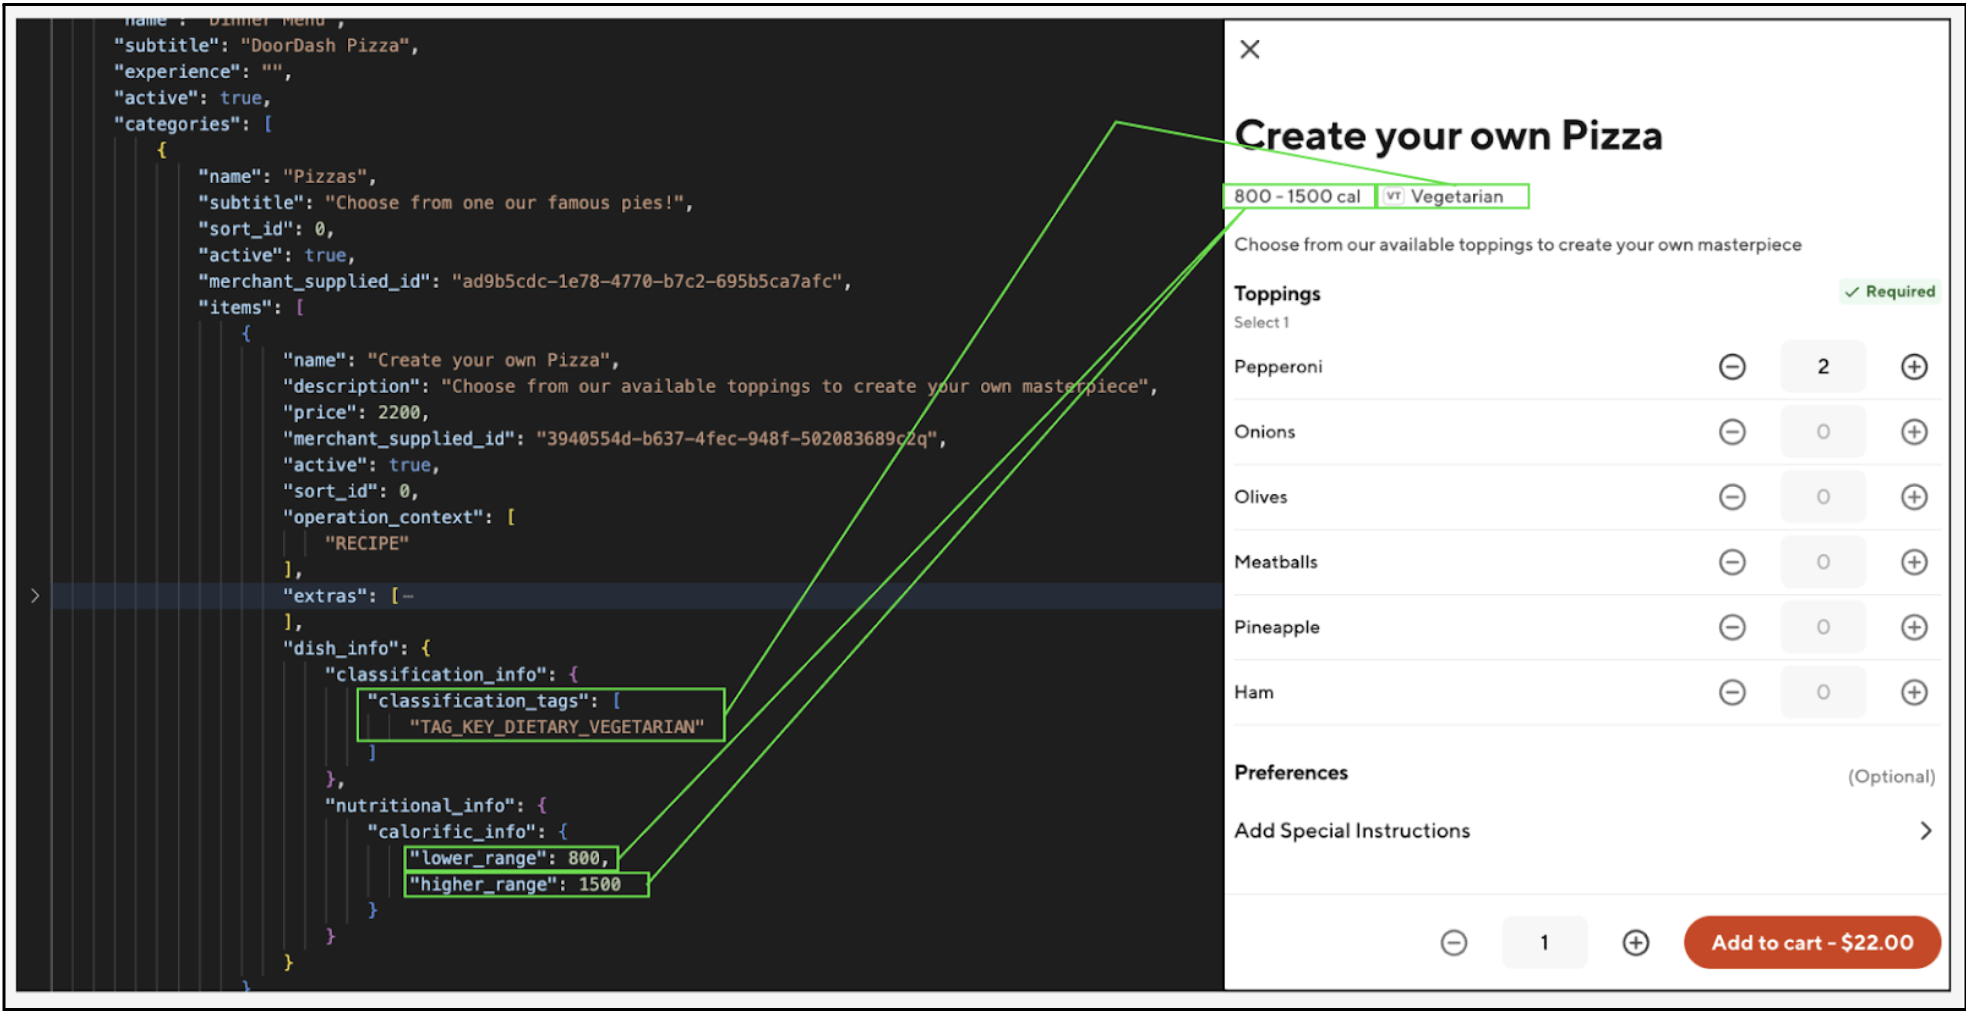
Dietary Information
item.dish_info.classification_info.classification_tag- dietary tag, current supported tags are:“TAG_KEY_DIETARY_VEGERATARIAN””TAG_KEY_DIETARY_VEGAN”“TAG_KEY_DIETARY_GLUTEN_FREE”
item.dish_info.nutritional_info.calorific_info.lower_rangeitem.dish_info.nutritional_info.calorific_info.upper_range
Item Special Hours
Item Special Hours can be used to limit item availability to certain periods within the specified menu hours. If not specified, then the item will always be shown and ordering hours will be enforced at the menu level. If specified then the item will only be visible on the menu during specified hours and Customers will receive a message at checkout if they try to place scheduled orders for these items outside of their available time.
item.item_special_hours.start_timeitem.item_special_hours.end_timeitem.item_special_hours.day_indexitem.item_special_hours.start_date- start date when item will be shown on the menu as an available selectionitem.item_special_hours.end_date- end date when item will be shown on the menu as an available selection
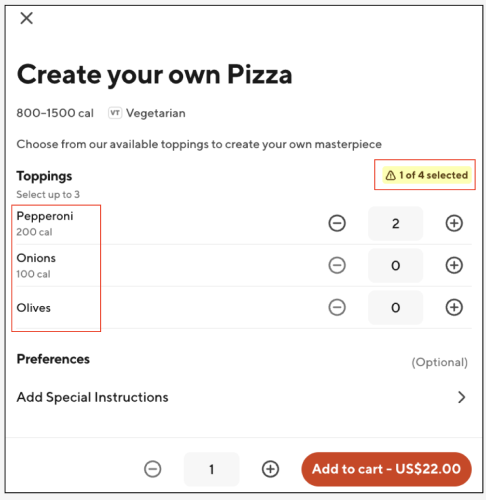
Extra Level
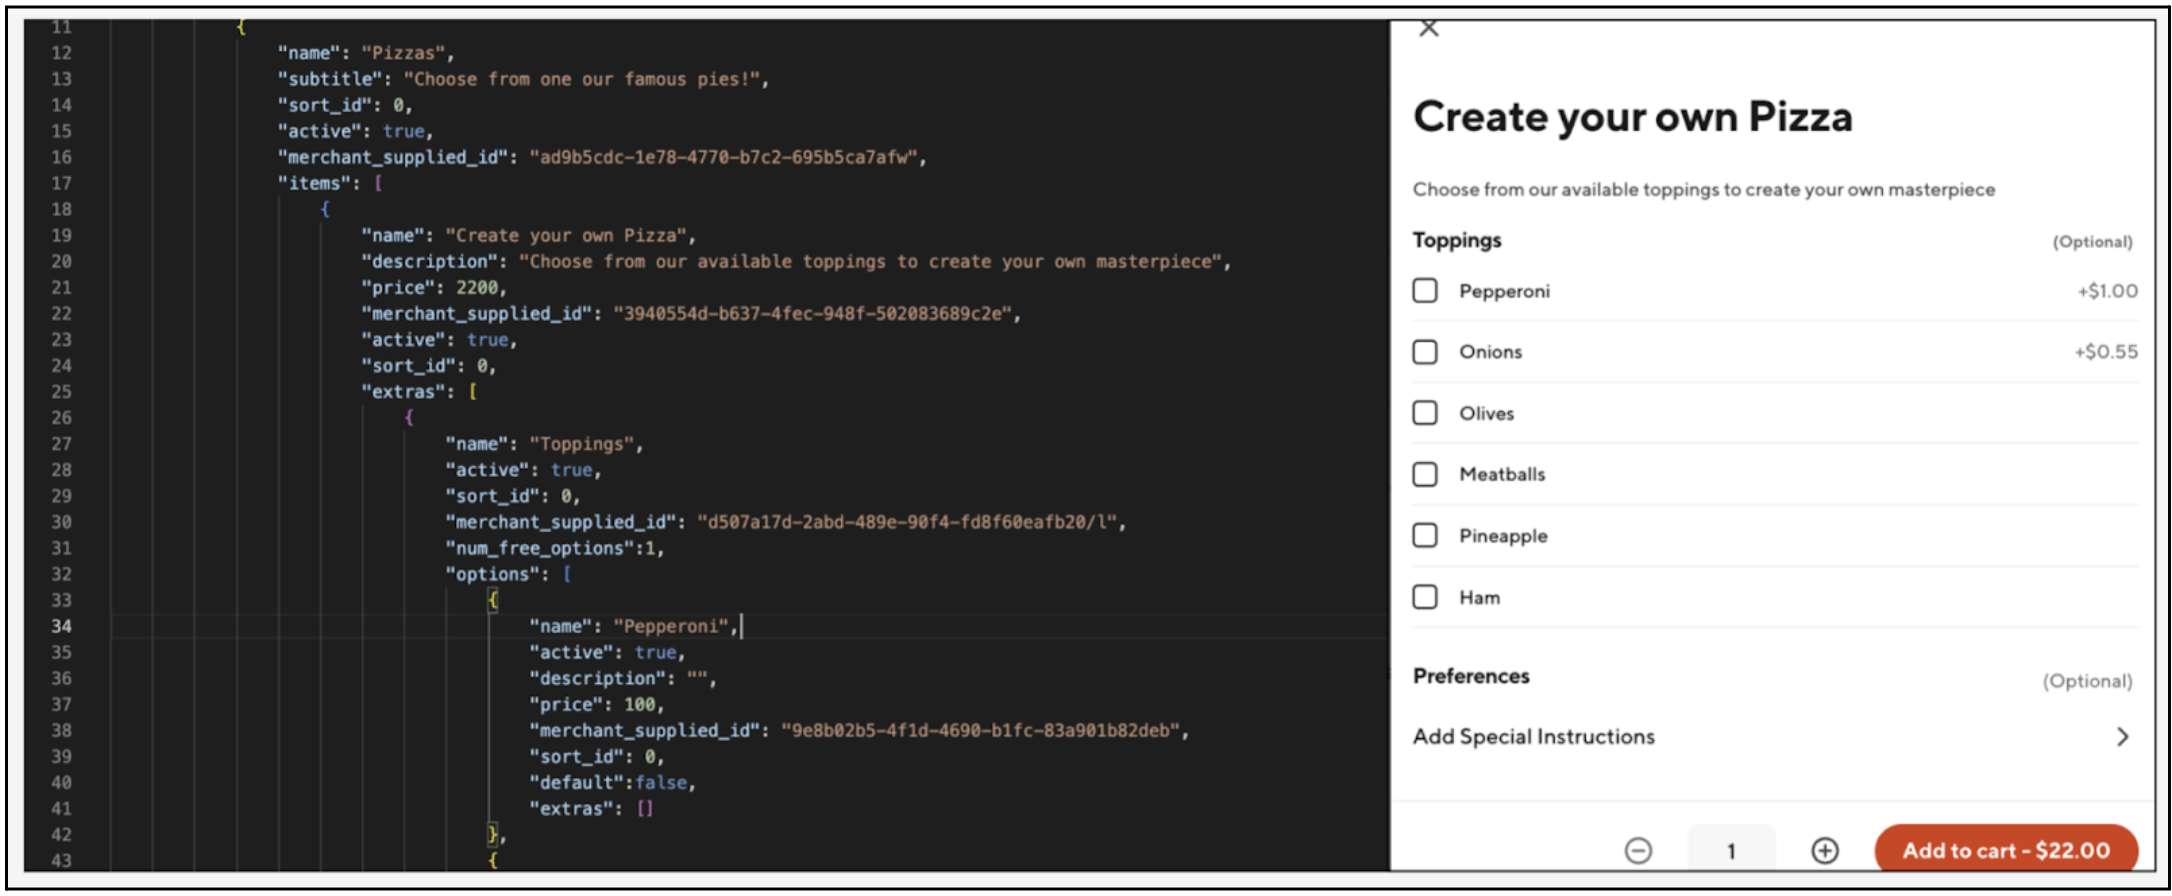
Think of extras as the equivalent of categories, but instead of containing items, they contain item modifiers ("options").
extra.name(required)extra.activeextra.sort_id- dictates extra sort order. As of June 2023, DD now sorts required modifiers to the top of the item page. If there are multiple required modifiers, they will be sorted using theirextra.sort_idextra.num_free_options- number of distinct options that the Consumer can add to the item for free.- If multiple different options are chosen, the cheapest of the selected options will be designated as free.
- Example: if Pepperoni costs $1.00 in the example below and Onions costs $0.50 and the consumer added 3x Onions and 1x Pepperoni, they would only be charged for the Pepperoni because Pepperoni’s unit
priceis higher.
"extras":  [
                {
                    "name": "Toppings",
                    "active": true,
                    "sort_id": 0,
                    "merchant_supplied_id": "d507a17d-2abd-489e-90f4-fd8f60eafb20/l",
                    "num_free_options":1,
                    "options": [
                        {
                            "name": "Pepperoni",
                            "active": true,
                            "price": 100,
                            "merchant_supplied_id": "9e8b02b5-4f1d-4690-b1fc-83a901b82deb",
                            "sort_id": 0,
                            "default": true,
                            "extras": []
                        },
                        {
                            "name": "Onions",
                            "active": true,
                            "price": 50,
                            "merchant_supplied_id": "8970747d-cc30-410a-8807-a0ac59967893",
                            "sort_id": 1,
                            "default": false,
                            "extras": []
                        }
                    ]
                }
            ]
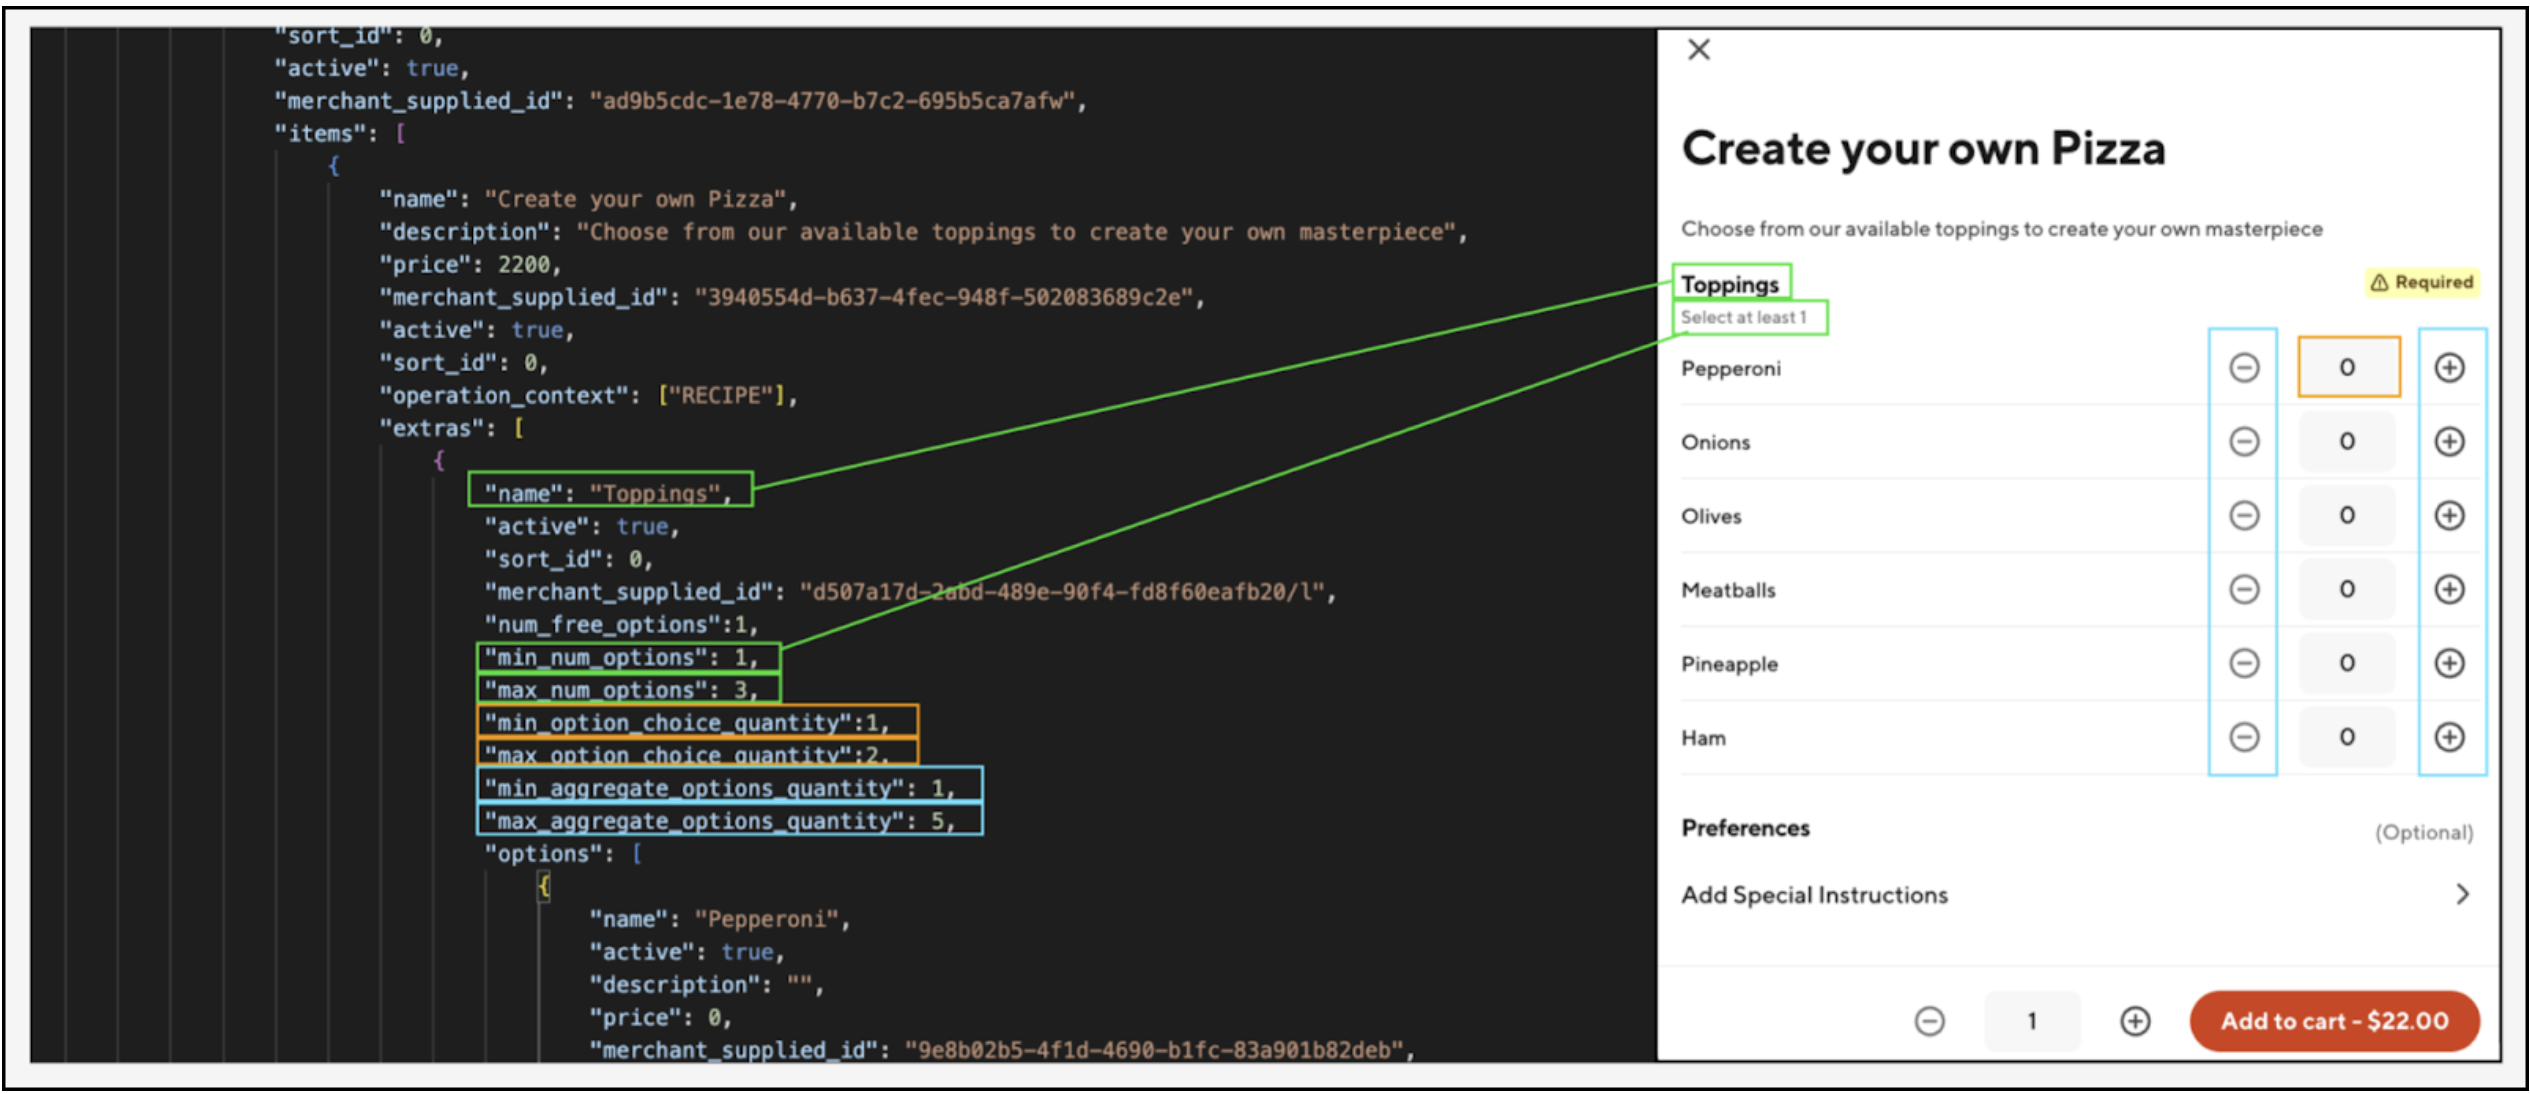
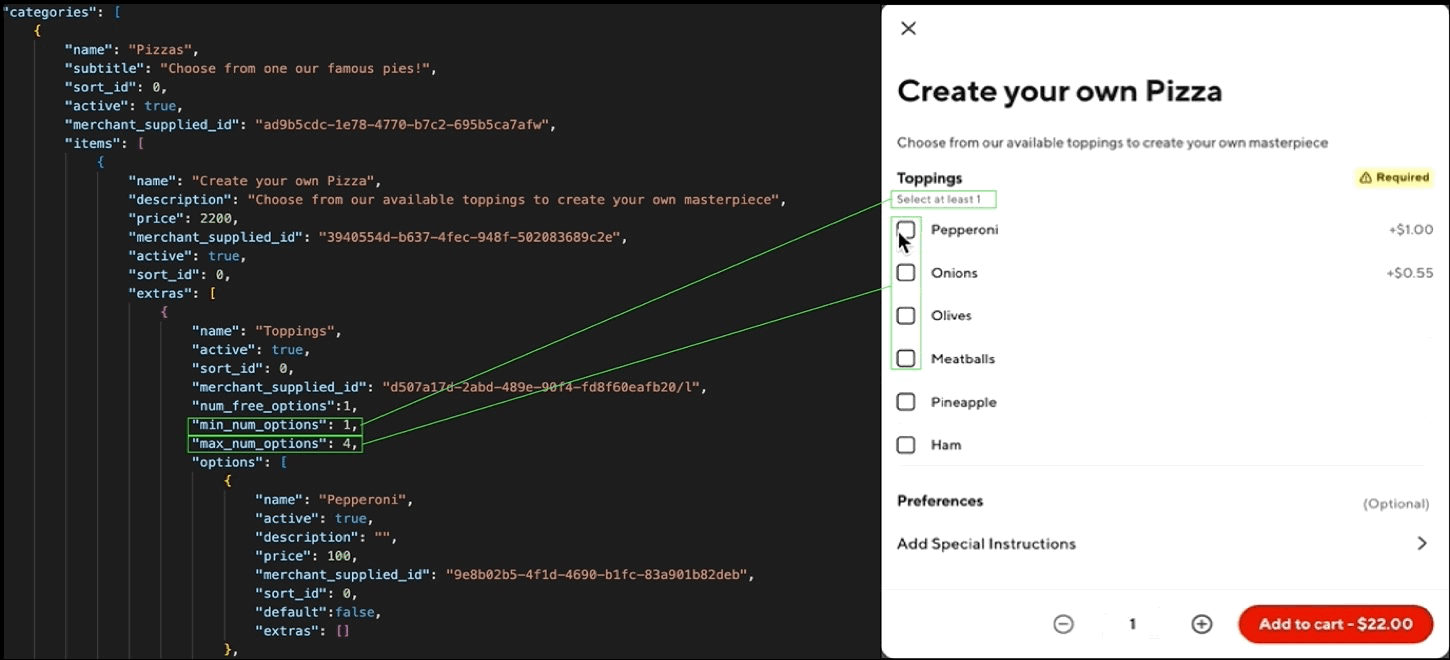
Quantity Enforcers
The representation of the menu on our Marketplace can vary significantly based on how these attributes are set, so multiple scenarios will be presented to provide clarity.
num_options
extra.min_num_optionsextra.max_num_options
Controls the number of distinct options within the extra that must/can be added to the item. This input also controls the subtext that is displayed under the extra name (e.g “Select at least 1”).
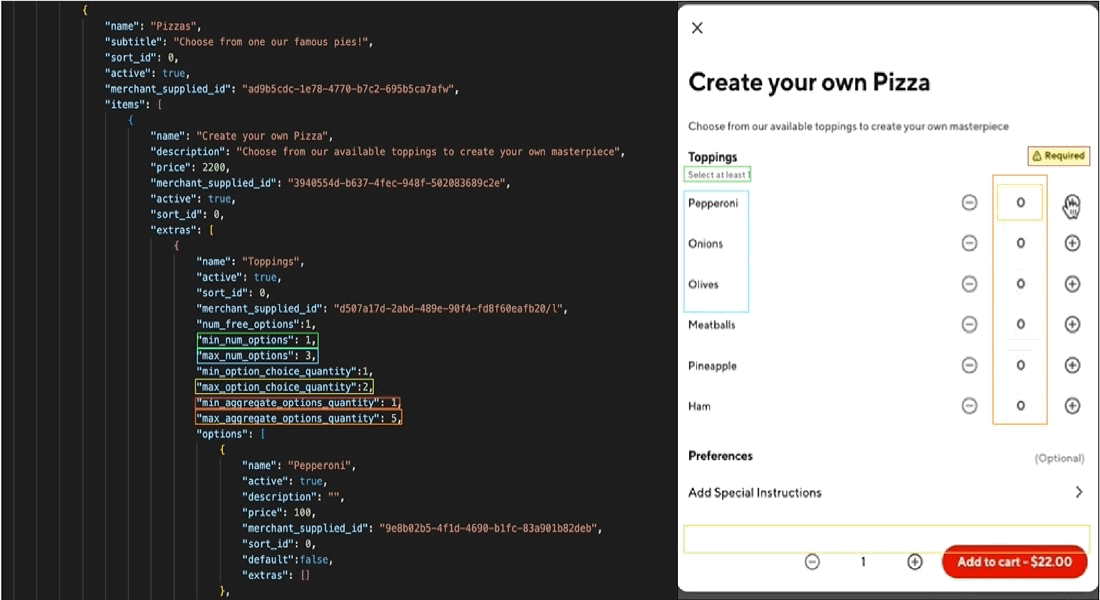
option_choice_quantity
extra.min_option_choice_quantityextra.max_option_choice_quantity
Controls the quantity of an individual option within the extra that must/can be added to the item.
aggregate_options_quantity
extra.min_aggregate_options_quantityextra.max_aggregate_options_quantity
Controls the total quantity of options within the extra that must/can be added to the item
Checkboxes
If none of the above inputs (num_options, option_choice_quantity, aggregate_options_quantity) are specified, the default selection method is checkboxes with no required selections and no max option limit.
If extra.min_num_options and extra.max_num_options are provided, then these will be used to enforce the required and max amount of options that must be selected
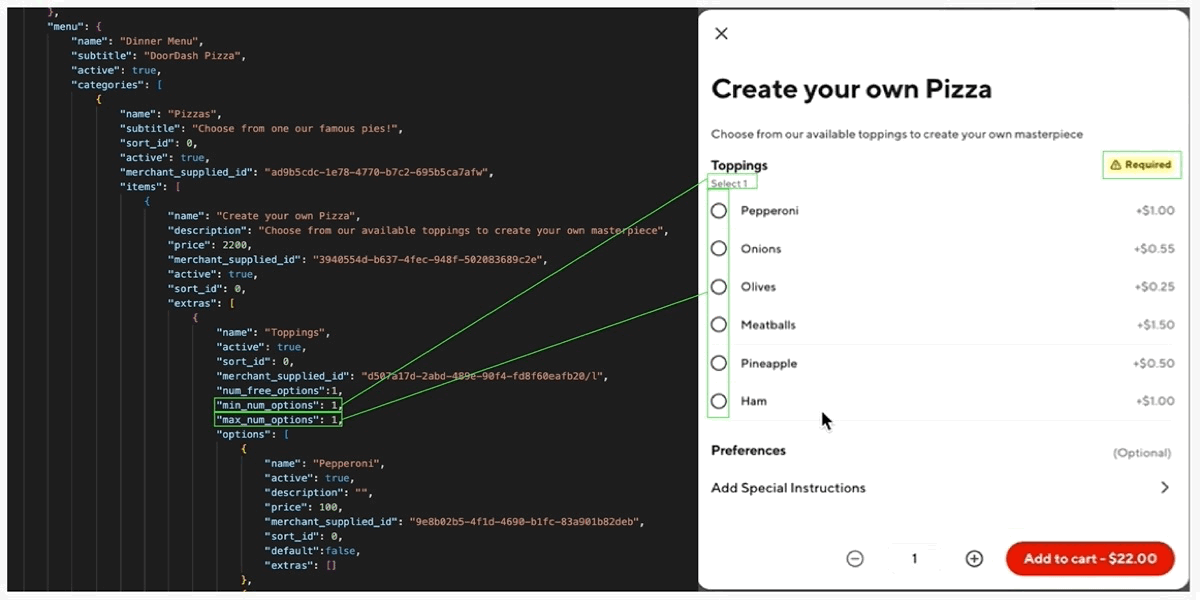
Radio Buttons
If extra.min_num_options and extra.max_num_options are both set to 1, then the selection method for the extra will be radio buttons rather than checkboxes.
Quantity Selectors
To offer quantity selectors as the selection method, extra.min_aggregate_options_quantity and extra.max_aggregate_options_quantity must be specified.
To limit the quantity of a single option that can be added within the extra, extra.min_option_choice_quantity and extra.max_option_choice_quantity can be used, however this validation will only be enforced once the consumer clicks ‘Add to cart’.
Quantity Selector Callouts:
- Additional nesting is not supported with quantity selectors.
- Example: you would not be able to have an additional extra within ‘Pepperoni’ that would allow the customer to choose ‘Spicy Pepperoni’ or ‘Mild Pepperoni’ as you could with checkboxes or radio buttons.
Quantity Enforcer Matrix
| Checkboxes | Radio Buttons | Quantity Selectors | |
|---|---|---|---|
min_num_options | Enforced if specified | Must = 1 | Enforced if specified |
max_num_options | Enforced if specified | Must = 1 | Enforced if specified |
min_option_choice_quantity | Not required | Not required | Enforced if specified |
max_option_choice_quantity | Not required | Not required | Enforced if specified |
min_aggregate_options_quantity | Must be omitted | Must be omitted | Required |
max_aggregate_options_quantity | Must be omitted | Must be omitted | Required |
Defective Scenarios
In certain cases, quantity enforcers can be configured in a way that makes the item impossible to order.
In the below example, "min_num_options": 4, but only 3 options are available
To provide a better experience for consumers, DoorDash will proactively flag these scenarios and take the following actions.
| Scenario | Action |
|---|---|
min_num_options > num of active options | Item deactivated, will be reactivated once valid configuration is sent |
min_aggregate_options_quantity > num of active options | Item deactivated, will be reactivated once valid configuration is sent |
min_num_options > max_num_options | Item deactivated, will be reactivated once valid configuration is sent |
min_aggregate_options_quantity > max_aggregate_options_quantity | Item deactivated, will be reactivated once valid configuration is sent |
All items within menu update have item.”active”:false | Menu deactivated, will be reactivated once an update is sent with active items |
Option Level
option.name(required)option.price(required)option.base_price(required)option.activeoption.default- controls whether the option is pre-selected or not- For options that have quantity selectors, if
option.default:true, then the pre-selected quantity will be 1.
- For options that have quantity selectors, if
option.dish_info.calorific_info.lower_rangeoption.dish.info.classification_info.classification_tags
Recipes
Recipes logic can be used in cases where you wish to specify option.default_quantity > 1 for options. Additionally recipes can be used to specify a charge_above quantity for an option so that customers are only charged for the option once the charge_above quantity is exceeded.
option.operation.context- used to specify whether the option is part of the recipe or not.- Must contain
“RECIPE”in order fordefault_quantityandcharge_aboveto work as expected.
- Must contain
option.quantity_info.default_quantityoption.quantity_info.charge_above

Try it Yourself!
Once approved for onboarding, you can use the Postman collection (linked below) to create and update a menu for your test store:

Steps:
- Fork Collection into your own Workspace
- Set Collection variables
- Variables
User_Agent- {camelcase `provider_type`}/1.0- If your
provider_type= 'doordash_pizza' your User-Agent would beDoorDashPizza/1.0
- If your
Location_ID- can be accessed within Developer Portal storesProvider_type- can be accessed within Developer Portal ProvidersMenu-UUID- Once a menu is created for your store, you can access the menu UUID via these two methods:developer_id,key_id, andsigning_secret- can be generated/accessed within Developer Portal Credentials
- Variables
- Use example requests included in collection to create/update menus for your test stores