Self-Serve Integration Onboarding (SSIO)
Overview
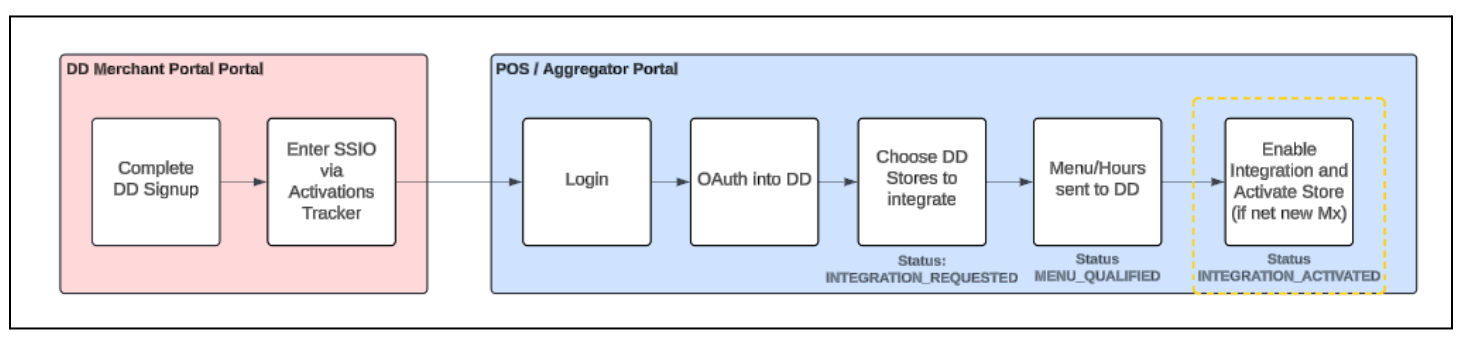
DoorDash has built a self-serve integration onboarding product to streamline and optimize the end-to-end experience for merchants onboarding to a Marketplace integration. This product provides the back-end infrastructure to allow our partners to build a seamless experience from within their own environment and allow the merchant to own which DoorDash store is onboarded and when. The top-level flow of this product and corresponding process would be:
-
Merchant starts from external Partner environment.
-
Merchant initiates the process (e.g. “Add the DoorDash integration”).
-
If merchant exists on DoorDash, merchant is prompted to “login with DoorDash” via oAuth.
- If merchant does not exist on DoorDash, merchant should be redirected to a deep linked DoorDash sign up URL. After completing sign up on DoorDash, the merchant returns to partner environment to complete the process below before starting at Step 5.
-
Merchant is prompted to select a DoorDash store for which they wish to integrate.
-
Selected DoorDash store receives an integrated menu.
-
Merchant has the option to review the menu and activates the integration.
 *
Detailed flow chart can be viewed here.*
*
Detailed flow chart can be viewed here.*
If you are looking for inspiration on what an end-to-end SSIO implementation might look like according to DoorDash certification requirements, please see our white-label implementation example here.
Net New vs. Existing Merchant Flow
For Merchants that do not have a DoorDash Merchant account, extra steps are required by the Merchant to complete the store sign up process. The high level flow for the merchant is described below:
-
Merchant will request for new store signup link using the Net New Merchant API.
-
Merchant uses the link to start store signup process at a deep linked DoorDash sign-up URL.
-
Once store configuration is completed by the merchant, an integration onboarding request is automatically submitted for the new store, and DoorDash will start publishing webhooks events to the provider with the onboarding status changes.
-
Merchant continues the remaining journey on the Integration Partner Portal
-
Once the integration is enabled, merchants will need to activate their store to start receiving orders from DoorDash Merchant Portal - Activations tracker page.
For Merchants that already exist on DoorDash, the steps required for onboarding are outlined in Onboarding Store to Integration.
API List
-
oAuth Redirection - From the Partner environent, Partner redirects the merchant to DoorDash for oAuth using a unique oAuth URL.
-
oAuth Token Exchange - After merchant logs in with their DoorDash credentials, the resulting URL will contain an exchange code which is used by the Partner to get the Merchant JWT.
-
Fetch DoorDash Stores - Using the Merchant JWT, Partner calls this endpoint to get the stores associated to the authenticated user.
-
Initialize Onboarding - Partner connects the location ID with the merchant-selected DoorDash store. DoorDash automatically attempts to ingest a menu once this is done.
-
Onboarding Status - After Initialize Onboarding, DoorDash sends webhooks reflecting the status of the store.
-
Menu Creation/Update - DoorDash pulls a menu after Initialize Onboarding; if it fails or the menu needs updated, Partner calls this endpoint to create or update the menu(s).
-
Activate Integration - Once the menu job is successful, Partner activates the integration.
-
New Store Deep Link - Partner calls DoorDash to receive a sign up URL where merchants can create a new DoorDash Merchant account (some merchants may have an existing Consumer account they logged in with but need to add a DoorDash store to enable their account as a Merchant account).
Rate Limit Information
All SSIO API endpoints have a rate limit threshold of 600 requests per minute per endpoint. If you have any concerns with this threshold, please let us know.
- Note: If after launching SSIO there is an unacceptable merchant pull-through rate (defined as the percentage of merchants who begin SSIO and are able to successfully complete activation without any blocking statuses), DoorDash may request to rollback while working on a solution for you to implement to improve this metric before reintroducing the SSIO product in your environment. If necessary, DoorDash may reduce your rate limit theshold to help enforce this.
Connect with DoorDash (oAuth)
Merchants may have multiple stores/locations on the Partner side, and multiple stores on the DoorDash side. In order to know which location ID should be mapped to which DoorDash Store ID, we will need the Merchant to identify the mapping - this will be done via oAuth.
oAuth
When the Merchant kicks off the process to "add the DoorDash integration"/ "connect with DoorDash" from the partner environment, the partner portal will redirect the merchant to DoorDash's Identity service login page with the set of URL params defined by the protocol.
Get started setting up your Client ID in Developer Portal by following our step-by-step guide here!
-
Client Id - Each partner is assigned a unique Client ID, which identifies them as an OAuth client in our system. This Client ID is required for authentication and integration in both production and sandbox provider environments.
-
Redirect URL - This will be set to a redirect URL provided by the POS partner. This URL is passed along from the partner portal redirecting the DoorDash identity web page.
- Note: This redirect URL needs to be added to an allowlist on the DoorDash side - please work with your Technical Account Manager or submit a Help request through Developer Portal to have this URL allowlisted. You will also need to provide URL(s) to your Terms & Conditions and Privacy Policies before being able to launch SSIO in production. The redirect URL used in your application must have the same scheme, authority, and prefix as the redirect URL allowlisted by DoorDash (definitions). This means if you allowlist
https://yoururl.com, you could use redirect URLs such ashttps://yoururl.com/some_value,https://yoururl.com/some_value/some_other_value, etc. However, using a different prefix such ashttps://somevalue.yoururl.comwill not work.
- Note: This redirect URL needs to be added to an allowlist on the DoorDash side - please work with your Technical Account Manager or submit a Help request through Developer Portal to have this URL allowlisted. You will also need to provide URL(s) to your Terms & Conditions and Privacy Policies before being able to launch SSIO in production. The redirect URL used in your application must have the same scheme, authority, and prefix as the redirect URL allowlisted by DoorDash (definitions). This means if you allowlist
Note: The following fields are required to be included as part of the oAuth URL:
- client_id
- redirect_url
- state
- response_type
- scope
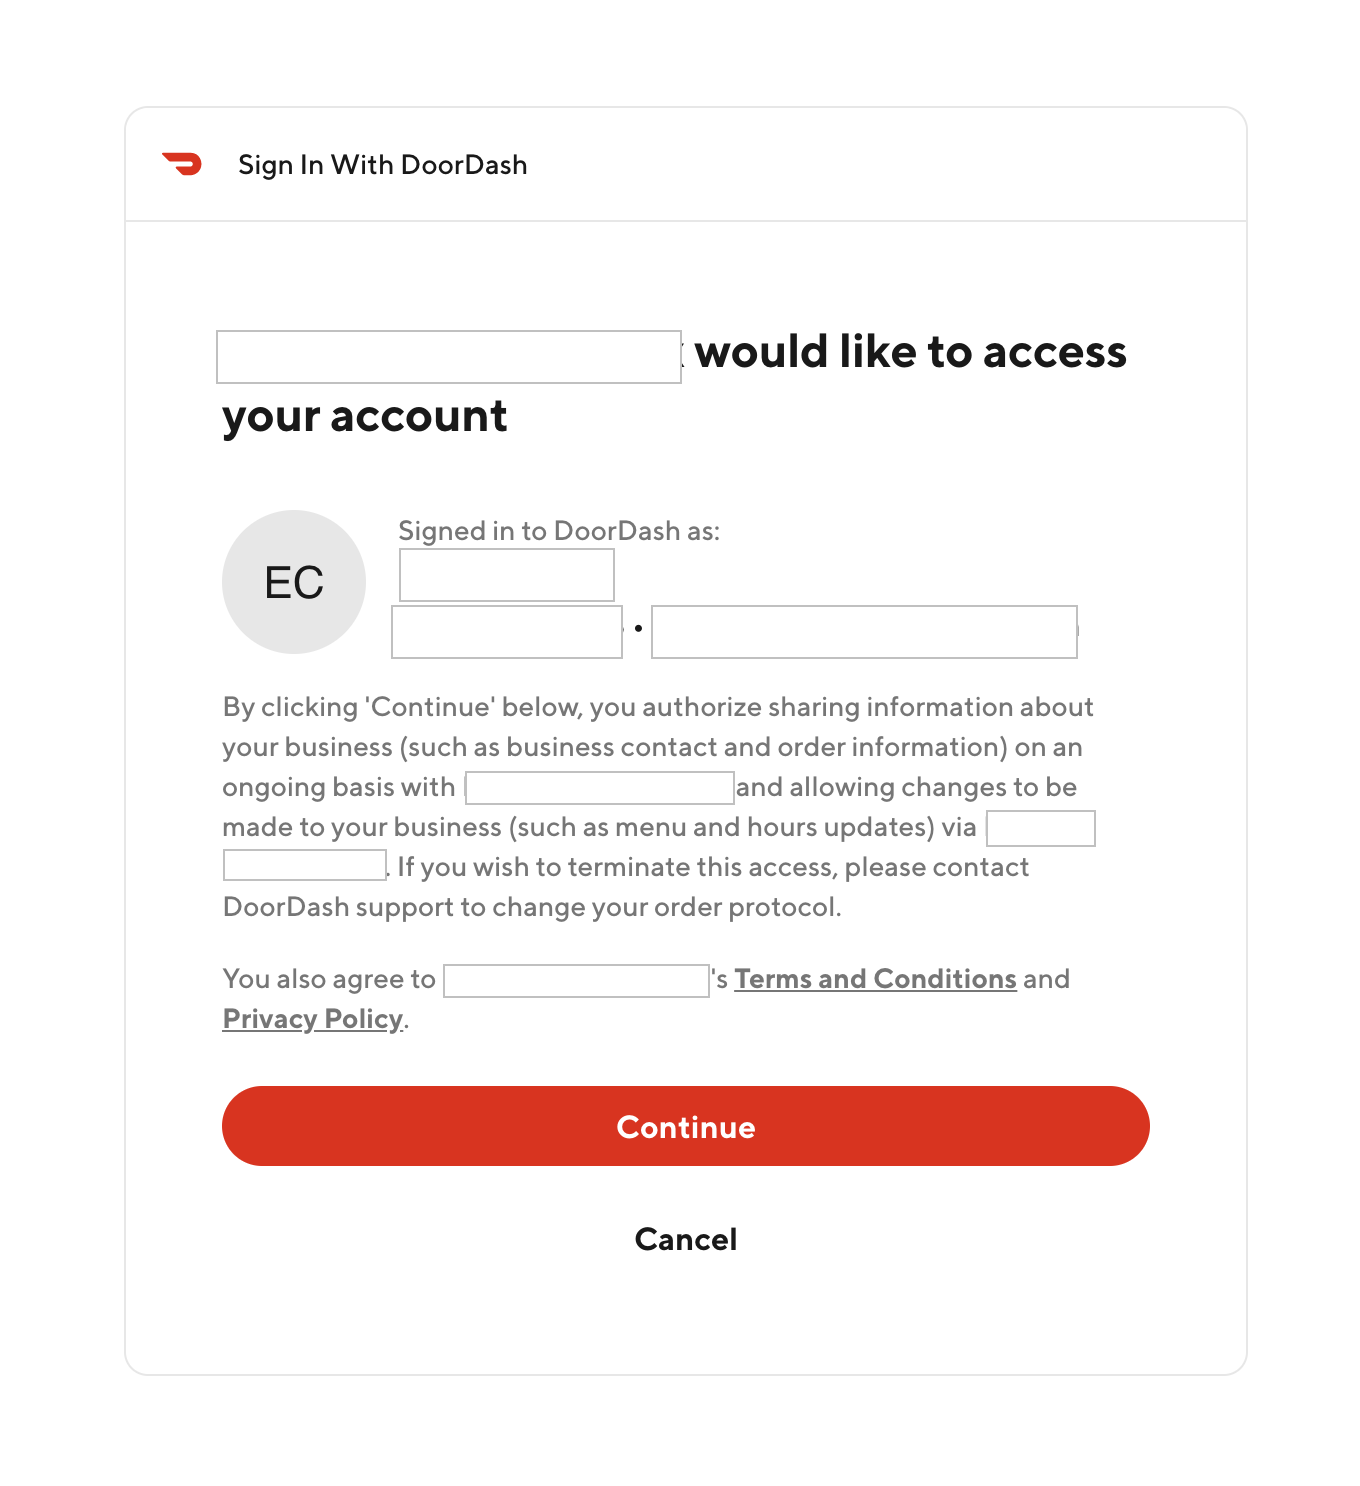
Consent
When a Merchant clicks "Connect to DoorDash'' from the partner portal, they will redirect to DoorDash and be presented with a consent page. This page is a confirmation of what resources will be shared from DoorDash to the partner for this merchant.
The following information for the merchant's business will be shared:
-
DoorDash Business ID
-
DoorDash Business Name
The following store information under that merchant's business will also be shared:
-
DoorDash Store ID
-
DoorDash Store Name
-
DoorDash Store Address
-
Store Geo Location
You must provide DoorDash with up-to-date links to your Terms & Conditions and Privacy Policies, as the merchant must acknowledge these before clicking "Connect to DoorDash". If you offer an integration with DoorDash in multiple regions (e.g. US, Canada, Australia), then these URLs must cover ALL regions (e.g. US, Canada, Australia) as DoorDash only supports 1 respective URL on the oAuth identity page.
Token Exchange & Expiration
Once the Merchant consents, the interaction proceeds with the oAuth code-for-token exchange:
-
DoorDash's Identity Service (IDS) redirects the Merchant back to the provider portal (to the redirect URL) with an access code and state in the query string.
-
The partner portal verifies the state.
-
POS partner portal (web) presents its API key and the received code to the DoorDash IDS in exchange for an access token (Merchant JWT).
You will need to use the token to request for the list of DoorDash stores and to initialize onboarding. This token will expire after one hour. If an expired token is being used, DoorDash will reject the token with a 401 response code when you make the request for DoorDash stores or to initialize onboarding, and the merchant will need to re-authenticate again.
Onboarding Store to Integration
Exchange Token
After successful OAuth, the partner will be given the code which is used to exchange the Merchant JWT, which will be used to fetch available DoorDash stores for the authenticated user (business).
Request Endpoint:
"request": {
  "method": "POST",
  "header": [
    {
      "key": "User-Agent",
      "value": "<Partner User Agent value>",
      "type": "text"
    },
    {
      "key": "Authorization",
      "value": "Bearer <Partner JWT>",
      "type": "text"
    },
    {
      "key": "auth-version",
      "value": "v2",
      "type": "text"
    }
  ],
  "url": "https://openapi.doordash.com/marketplace/api/v2/tokens",
  "protocol": "https"
}
Request:
{
    "exchange_code": "1f6262c2-1fb0-4bc3-80c5-af4a7bb06608"
}
Response (Response Code 200):
{
  "access_token": "eyJ0eXAiOiJKV1QiLCJhbGciOiJIUzI1NiJ9.eyJpc3MiOiJPbMerchantpbmUgSldUIEJ1aWxkZXIiLCJpYXQiOjE2NjMzNTU5MzMsImV4cCI6MTY5NDg5MTkzMywiYXVk"
}
Note: The access_token returned will be used in the Fetch Stores and Initialize Onboarding API calls. This token will expire after one hour so the merchant may need to re-authenticate if the API calls are not made within that time. The access_token can only be used to create the merchant token once.
Fetch DoorDash Stores
After successful OAuth code exchange, the partner will be given the Merchant JWT, which can be used to fetch the business and store information from DoorDash for the authenticated user.
Important Things to Note:
- If the
store_candidatesarray is empty, this indicates there are no available stores for the merchant to onboard as the merchant is not on DoorDash yet. In this scenario, we require that partners then surface a call to action for the merchant to sign up on DoorDash using the Net New Merchant API). - If the authenticated user is NOT an Authorized User (Business Admin, Parent Company Admin, Franchise Group Admin, Franchise Admin, or Store Manager) role on the business they are associated with, you will see a
412error returned with this endpointuser does not has business admin access to all stores. In this scenario, the merchant should NOT be directed to the Net New API as the merchant already exists, and simply needs to enter the credentials for their Authorized User role. - The returned list of stores will include stores that are ineligible to onboard which are DoorDash Drive stores, Retail UI stores, or Virtual Brand locations (if your integration does not support virtual brands); these stores are ineligible to onboard via this flow and will be indicated by a
FALSEvalue for theis_eligible_to_onboardfield. To avoid merchant confusion, please display ALL stores listed in the API response, where any store with"is_eligible_to_onboard": "false"should not be able to be selected by the merchant. - Some merchants on DoorDash may also have stores associated with different business IDs; in that scenario merchants can contact DoorDash Support to combine those stores into a single business ID on DoorDash so that the expected stores are shown after oAuth. You may a callout in your UI to tell merchants to contact DoorDash Support if they do not see a store which they expect to be included under their authorized user credentials.
- To help ensure merchants do not inadvertently select the incorrect store, please display both the Partner Store Name as well as the DoorDash Store Name in your location selection UI.
Request Endpoint:
"request": {
  "method": "GET",
  "header": [
    {
      "key": "User-Agent",
      "value": "<Partner User Agent value>",
      "type": "text"
    },
    {
      "key": "Authorization",
      "value": "Bearer <Partner JWT>",
      "type": "text"
    },
    {
      "key": "MxAuthorization",
      "value": "Bearer <Merchant JWT>",
      "type": "text"
    },
    {
      "key": "auth-version",
      "value": "v2",
      "type": "text"
    }
  ],
  "url": "https://openapi.doordash.com/marketplace/api/v2/store_candidates",
  "protocol": "https"
}
Note: The access_token returned from Exchange Tokens API is to be used for MxAuthorization. This token will expire after one hour so the merchant may need to re-authenticate if this API call is not made within that time. The access_token can only be used to create the merchant token once.
Query Parameter:
"limit": 10, // supporting pagination
"offset": 5
Note: The max limit value supported is 100. The above example would return a total of 15 stores. If merchants have a very high number of stores (e.g. 100+), you can adjust this API call to ensure all stores are returned.
The below example would return up to 200 stores:
"limit": 100, // supporting pagination
"offset": 100
The below example would return up to 500 stores:
"limit": 100, // supporting pagination
"offset": 400
Response (Response Code 200):
{
  "store_candidates": [
    {
      "name": "Yummy BBQ (Los Angeles)",
      "doordash_store_uuid": "f1c7i73b-64ca-4586-b990-171agvfbca2d",
      "address": "257 Fireweed Ln, Ketchikan, AK 99901, USA",
      "lat": 42.3429626,
      "lng": -71.1221165,
      "business_name": "Yummy BBQ",
      "business_uuid": "4c7c8ee3-b3bd-4b24-892e-2886bfbd654f",
      "is_active_on_integration": true/false [boolean],
      "is_eligible_to_onboard": true/false [boolean]
    },
    {
      "name": "Yummy BBQ (Palo Alto)",
      "doordash_store_uuid": "f1c7f43b-64ca-4586-h950-171aaafbca2d",
      "address": "901 Market St, San Francisco, CA 94103, USA",
      "lat": 45.3429626,
      "lng": -74.1221165,
      "business_name": "Yummy BBQ",
      "business_uuid": "4c7c8ee3-b3bd-4b24-892e-2886bfbd654f",
      "is_active_on_integration": true/false [boolean],
      "is_eligible_to_onboard": true/false [boolean]
    }
  ],
  "limit": 100
  "offset": 200
  "total_count": 500
}
Initialize Onboarding
Once the Merchant has oAuth'd and has their list of DoorDash stores, they can select the mapping of partner store/location and DoorDash store on the provider portal. After a selection, the partner will call DoorDash to initialize the onboarding by providing the below information. This request is asynchronous.
- Idempotency: when accounting for timeouts or other failures, if you call this endpoint multiple times with the same request, there will not be multiple
onboarding_idvalues created. Once the first call is accepted and the onboarding is initialized, any subsequent calls would return a412response code.
Request Endpoint:
"request": {
  "method": "POST",
  "header": [
    {
      "key": "User-Agent",
      "value": "<Partner User Agent value>",
      "type": "text"
    },
    {
      "key": "Authorization",
      "value": "Bearer <Partner JWT>",
      "type": "text"
    },
    {
      "key": "MxAuthorization",
      "value": "Bearer <Merchant JWT>",
      "type": "text"
    },
    {
      "key": "auth-version",
      "value": "v2",
      "type": "text"
    }
  ],
  "url": "https://openapi.doordash.com/marketplace/api/v2/store_onboarding",
  "protocol": "https"
}
Note: MxAuthorization header was added to this endpoint in June 2023. If you built SSIO prior to June 2023, please work with your DoorDash Technical Account Manager to update your implementation.
Note: The access_token returned from Exchange Tokens API is to be used for MxAuthorization. This token will expire after one hour so the merchant may need to re-authenticate if this API call is not made within that time.
Request:
{
  "doordash_store_uuid": "f1c7f43b-64ca-4586-b990-171aaafbca2d",
  "location_id": "xdDJSnx", [unique store/location ID on the partner side]
  "provider_store_name": "Yummy BBQ",
  "provider_store_address": "91 Market St, San Francisco, CA 94103, USA",[optional]
  "merchant_decision_maker_email": "[email protected]", [optional]
}
Response (Response Code 202):
{
    "onboarding_id": "9154103a-be82-48fc-978d-792171f7ee32"
}
Fetch Onboarding Status
After successfully submitting the store onboarding request, an onboarding entry will be persisted in the DoorDash POS store onboarding platform. Onboarding status should be shown to the Merchant in the partner environment as part of the onboarding experience. There are two ways to check the current progress of the onboarding status, but you are required to subscribe to the webhook events; using the GET endpoint is an optional enhancement:
- [REQUIRED] Subscribe to Webhook Events
Partners must have an endpoint configured to listen to DoorDash store onboarding status webhooks. To enable this, the partner will register a subscription endpoint for DoorDash to send webhooks to via DoorDash Developer Portal. Once a status changes on the onboarding store, a webhook event will be sent to the provided subscription endpoint. If a webhook fails, it will be retried 3 times. The payload format for this webhook will be the following:
{
  "onboarding_id": "9154103a-be82-48fc-978d-792171f7ee32",
  "location_id": "xdDJSnx", [unique store/location id on the partner side],
  "doordash_store_uuid": "f1c7f43b-64ca-4586-b990-171aaafbca2d",
  "status": "ABANDONED",
  "exclusion_code": "DUPLICATE_LOCATION_ID",
  [if applicable - reason pre-onboarding validation failure]
  "details": "", [additional details]
  "menus": [
    {
      "menu_uuid": "949e6d70-371a-4250-8fe7-2d13b141e07g",
      "menu_preview_link": "https://doordash.com/menu/1234"
      "menu_error": "reason why menu failed to be pulled"
    }
  ]
}
- [Optional] Call DoorDash GET API endpoint
Partners can make a GET http method to a DoorDash API endpoint to get the same information returned from the webhook noted above. Subscribing to the Fetch Onboarding Status webhook (4a, above) is mandatory as part of SSIO implementation to avoid missing any updates in the onboarding status progress. Using this GET API endpoint is not a suitable replacement for subscribing to the webhook notifications.
Request Endpoint:
"request": {
  "method": "GET",
  "header": [
    {
      "key": "Authorization",
      "value": "Bearer <Partner JWT>",
      "type": "text"
    },
    {
      "key": "auth-version",
      "value": "v2",
      "type": "text"
    },
    {
      "key": "User-Agent",
      "value": "<Partner User Agent value>",
      "type": "text"
    }
  ],
  "url": "https://openapi.doordash.com/marketplace/api/v2/store_onboarding/<onboarding_id>",
  "protocol": "https"
}
Query Parameter:
No query parameter is needed.
Response (Response Code 200):
{
  "onboarding_id": "9154103a-be82-48fc-978d-792171f7ee32",
  "location_id": "xdDJSnx", [unique store/location id on the partner side],
  "doordash_store_uuid": "f1c7f43b-64ca-4586-b990-171aaafbca2d",
  "status": "ABANDONED",
  "exclusion_code": "DUPLICATE_LOCATION_ID",
  [if applicable - reason pre-onboarding validation failure]
  "details": "", [additional details]
  "menus": [
    {
      "menu_uuid": "949e6d70-371a-4250-8fe7-2d13b141e07g",
      "menu_preview_link": "https://doordash.com/menu/1234"
      "menu_error": "reason why menu is failed to be pulled"
    }
  ]
}
Possible Onboarding Status Values:
- Note: The UI in the partner environment should prevent skipping status values. For example, a merchant should not be able to trigger INTEGRATION_ACTIVATED status from the UI unless the status value is MENU_QUALIFIED since the request will fail.
| Onboarding Status | Details |
|---|---|
| ⌛ MENU_REQUESTED | Menu creation webhook has been sent; POS menus have been imported for this store onboarding request. |
| ⌛ INTEGRATION_REQUESTED | Integration process has been initiated but is not yet complete. These stores will only be in that state for a few hundred milliseconds and this status can be ignored. |
| 🔴 MENU_BLOCK | Menu ingestion failed OR Menu validation unsuccessful on DoorDash. A new menu ingestion is needed for this onboarding to continue. This is the expected status when the menu ingestion has an issue. An error will be provided here, and Merchant needs to fix the menu and redo the menu ingestion. |
| 🔴 ACTIVATION_BLOCK | An unexpected or unknown POS activation attempt failure. This is the expected status when an attempt to activate the POS order protocol failed. |
| ✅ MENU_QUALIFIED | Menu has passed auto QA and the POS onboarding is ready to be activated. Auto QA ensures there are no missing hours or blank menus. This is the expected status for a menu to be reviewed by the Merchant. |
| ✅ INTEGRATION_ACTIVATED | The POS integration has been activated for this store. This is the expected status when a store is successfully activated on POS protocol. |
| 🔴 ABANDONED | The POS onboarding had been abandoned due to failing any of the onboarding validations or hitting any unexpected error within DoorDash. This is the expected status when an onboarding cannot be processed either due to validation failure or internal error. An exclusion_code should be provided to indicate the reason causing the onboarding to be abandoned (see table below). |
Possible Exclusion Code Values:
- Note: The below exclusion code values may occur when activation is blocked due to store or menu validation.
| Exclusion Category | Exclusion Code | Details |
|---|---|---|
| ABANDONED | DUPLICATE_LOCATION_ID | This location_ID / provider_type combination is being used on another POS store. This partner location is already integrated with a store on DoorDash. Please contact DoorDash Support if this location is incorrectly integrated with an existing DoorDash Store ID. |
| ABANDONED | DOORDASH_RETAIL_STORE | This store is using a non-restaurant UI on DoorDash for performance purposes and is not eligible to integrate. |
| ABANDONED | VIRTUAL_BRAND_DETECTED | This store is identified as a virtual concept, and the integration you are attempting to onboard does not support unique location_id values across virtual concepts. This store is therefore ineligible to integrate. Please contact DoorDash Support if you believe this to be incorrect for this store. |
| ABANDONED | SELF_DELIVERY_DETECTED | The store is currently enabled for Self Delivery, but your integration does not support Self Delivery. Please contact DoorDash Support to disable Self-Delivery and process the financial rate change associated to unblock this store onboarding. |
| ABANDONED | DOORDASH_DRIVE_STORE | DoorDash Drive stores cannot be onboarded to DoorDash Marketplace. |
| ABANDONED | STORE_LIVE_ON_REQUESTED_POS_PROVIDER | This store is already live on the requested POS integration with this location ID. |
| ABANDONED | SFDC_ACCOUNT_RECORD_NOT_FOUND | No existing internal DoorDash account found for the store; DoorDash needs to create an internal account for this store before you can proceed. This is not expected to occur; please contact DoorDash for support in resolving if this error is encountered. |
| MENU_BLOCK | MENU_PULLING_REQUEST_FAILURE | Menu Job failed due to internal issue. Please retry the menu ingestion. |
| MENU_BLOCK | STORE_HOURS_NOT_POPULATED_FAILURE | Menu Job failed due to missing menu hours. Please ensure the menu(s) being ingested have valid hours and retry the menu ingestion. |
| MENU_BLOCK | MENU_BLANK_FAILURE | Menu Job succeeded, but the menu has no items. Please ensure the menu(s) being ingested have valid contents and retry the menu ingestion. |
| MENU_BLOCK | MENU_JOB_FAILURE | Menu Job failed due to issues with the menu. This may be due to missing contents, null category/item names, or other issues with the menu. |
DoorDash Integration Onboarding team monitors SSIO exclusion values on a daily basis in near-realtime to help merchants and partners alike get unblocked for an optimal merchant experience. The below table outlines the action that the Integration Onboarding team takes when certain exclusion codes are observed in SSIO production volume.
| Status | Exclusion Code | IO Action |
|---|---|---|
| ABANDONED | DUPLICATE_LOCATION_ID | Team confirms with both Merchant and Partner what the correct location_id should be for this location, and if correct, then confirms what the correct location_id should be for the existing duplicate location. If existing store is decommissioned due to out of business or change of ownership, then IO unblocks. |
| ABANDONED | STORE_LIVE_ON_REQUESTED_POS_PROVIDER | Team emails Merchant that they are already live on the integration with the expected location_id. |
| MENU_BLOCK | STORE_HOURS_NOT_POPULATED_FAILURE | Team confirms no hours to ensure error accuracy; emails Merchant to inform them of missing hours. Merchant instructed to work with Partner to resolve issue if needed. |
| MENU_BLOCK | MENU_JOB_FAILURE | Team confirms menu job failure reason and emails Merchant with error details. Merchant instructed to work with Partner to resolve issue if needed. |
| MENU_BLOCK | MENU_BLANK_FAILURE | Team emails merchant and informs of blank menu. Merchant instructed to work with Partner to resolve issue if needed. |
Menu Creation/Update
Once the Initialize Onboarding step is completed, a menu ingestion is automatically triggered (this is why SSIO mandates Menu Pull as a prerequisite). If the menu job fails or the merchant simply has not finished preparing their menu yet, you can use this API endpoint to trigger a menu job. DoorDash internal logic will either create a new menu (if the menu has not been created yet or the first menu creation attempt failed) or update the existing menu (if the initial menu creation was successful and there is an existent menu associated with this onboarding_id).
Note: In the event of a failure on the initial menu creation, the merchant must have a self-serve way to retry the menu ingestion from the partner environment. To trigger a menu update, the "id": "menu-id" (UUID) field is required to be in the payload for the menu to be updated successfully and move forward with onboarding.
Note: Once the merchant is activated through SSIO, please do NOT use this endpoint to update the menu or create new menus thereafter. This endpoint is only intended for use during the store onboarding process. Once the Onboarding Status is "Integration Activated", calling this API to update the menu will return an error and the menu will not be updated. Please continue creating and updating menus via your current method (e.g. POST/PATCH /api/v1/menus) once a store has been activated via SSIO.
Request Endpoint:
"request": {
  "method": "POST",
  "header": [
    {
      "key": "Authorization",
      "value": "Bearer <Partner JWT>",
      "type": "text"
    },
    {
      "key": "auth-version",
      "value": "v2",
      "type": "text"
    },
    {
      "key": "User-Agent",
      "value": "<Partner User Agent value>",
      "type": "text"
    }
  ],
  "url": "https://openapi.doordash.com/marketplace/api/v2/store_onboarding/<onboarding_id>/menus",
  "protocol": "https"
}
Request:
No request payload is needed.
Response (Response Code 202):
{}
Activate Integration
After a successful menu ingestion, the Onboarding Status will reflect the successful menu ingestion with menu_uuid(s) and menu_preview_links(s). With the menu preview link, merchants can preview their menu(s) on DoorDash. Once the menu contents look good to the merchant, the partner can call the Activate Integration API to activate the POS integration on DoorDash. This process is asynchronous but is expected to be completed within a few minutes at most. If successful, this step will:
-
Activate the POS menu(s) associated with this store onboarding
-
Deactivate all previous menu(s) associated with this store (if applicable - this includes both integrated and non-integrated menus previously associated with this store)
-
Change order protocol to POS (if applicable)
Note: This endpoint does NOT change the is_active status of a store. If a merchant is new to DoorDash, please see the Store Activation within SSIO section.
Request Endpoint:
"request": {
  "method": "POST",
  "header": [
    {
      "key": "Authorization",
      "value": "Bearer <Partner JWT>",
      "type": "text"
    },
    {
      "key": "auth-version",
      "value": "v2",
      "type": "text"
    },
    {
      "key": "User-Agent",
      "value": "<Partner User Agent value>",
      "type": "text"
    }
  ],
  "url": "https://openapi.doordash.com/marketplace/api/v2/store_onboarding/<onboarding_id>/enable",
  "protocol": "https"
}
Request:
No request payload is needed.
Response (Response Code 202):
{}
Net New Merchant API
If a merchant does not have a DoorDash account yet or needs to create a store as a Merchant from an existing Consumer account, calling this API will return a sign up URL that will have some onboarding information pre-filled for the merchant. After the merchant clicks on the sign up link and finishes store sign up, a webhook with the onboarding status update will be sent to the partner. At that point, the merchant can continue the same flow as existing merchants would. To ensure net new merchants sign up on DoorDash through this API to deep-link your provider_type / location_id, you should include a call to action option to "Sign up on DoorDash" as part of your SSIO implementation. The default "Sign Up" option on our standard identity page will not have your provider_type / location_id deep-linked and therefore cause merchant confusion.
Important Things to Note:
- This API should ONLY be called if a merchant indicates they are new to DoorDash or are trying to create a store on DoorDash as a Merchant on an existing Consumer account. You should NOT call this API in any part of the SSIO flow unless the merchant needs to be redirected to the
signup_urlreturned in the response. - When a merchant finishes signing up on DoorDash via the
signup_url, DoorDash will immediately start sending Onboarding Status webhooks to the partner; it is therefore critical to this flow that you are listening to Onboarding Status webhooks so that when the merchant returns to your environment they can pick right back up where they left off from the SSIO flow. See Net New vs. Existing Merchant flow for clarification. - Referral tracking is not currently offered within the scope of SSIO.
- This API does not support new store expansion at this time (e.g. existing Merchant account with store #1 adding store #2).
Request Endpoint:
"request": {
  "method": "POST",
  "header": [
    {
      "key": "Authorization",
      "value": "Bearer <Partner JWT>",
      "type": "text"
    },
    {
      "key": "auth-version",
      "value": "v2",
      "type": "text"
    },
    {
      "key": "User-Agent",
      "value": "<Partner User Agent value>",
      "type": "text"
    }
  ],
  "url": "https://openapi.doordash.com/marketplace/api/v2/signup_url",
  "protocol": "https"
}
Request:
{
  "location_id": "xdDJSnx",
  "store_name": "Yummy BBQ",
  "business_phone": "9253812577",
  "email": "[email protected]",
  "first_name": "James",
  "last_name": "Smith",
  "address": {
    "street_address": "303 2nd St",
    "city": "San Francisco",
    "state": "CA",
    "country": "US",
    "zip": "94103",
  },
  "locale": "en-US",
}
Response (Response Code 200):
{
  "signup_url": "https://www.doordash.com/merchant/applyV2/choose-package?uuid=283be1c0-8sds29d-46bd-a710-8ae7dsdds"
}
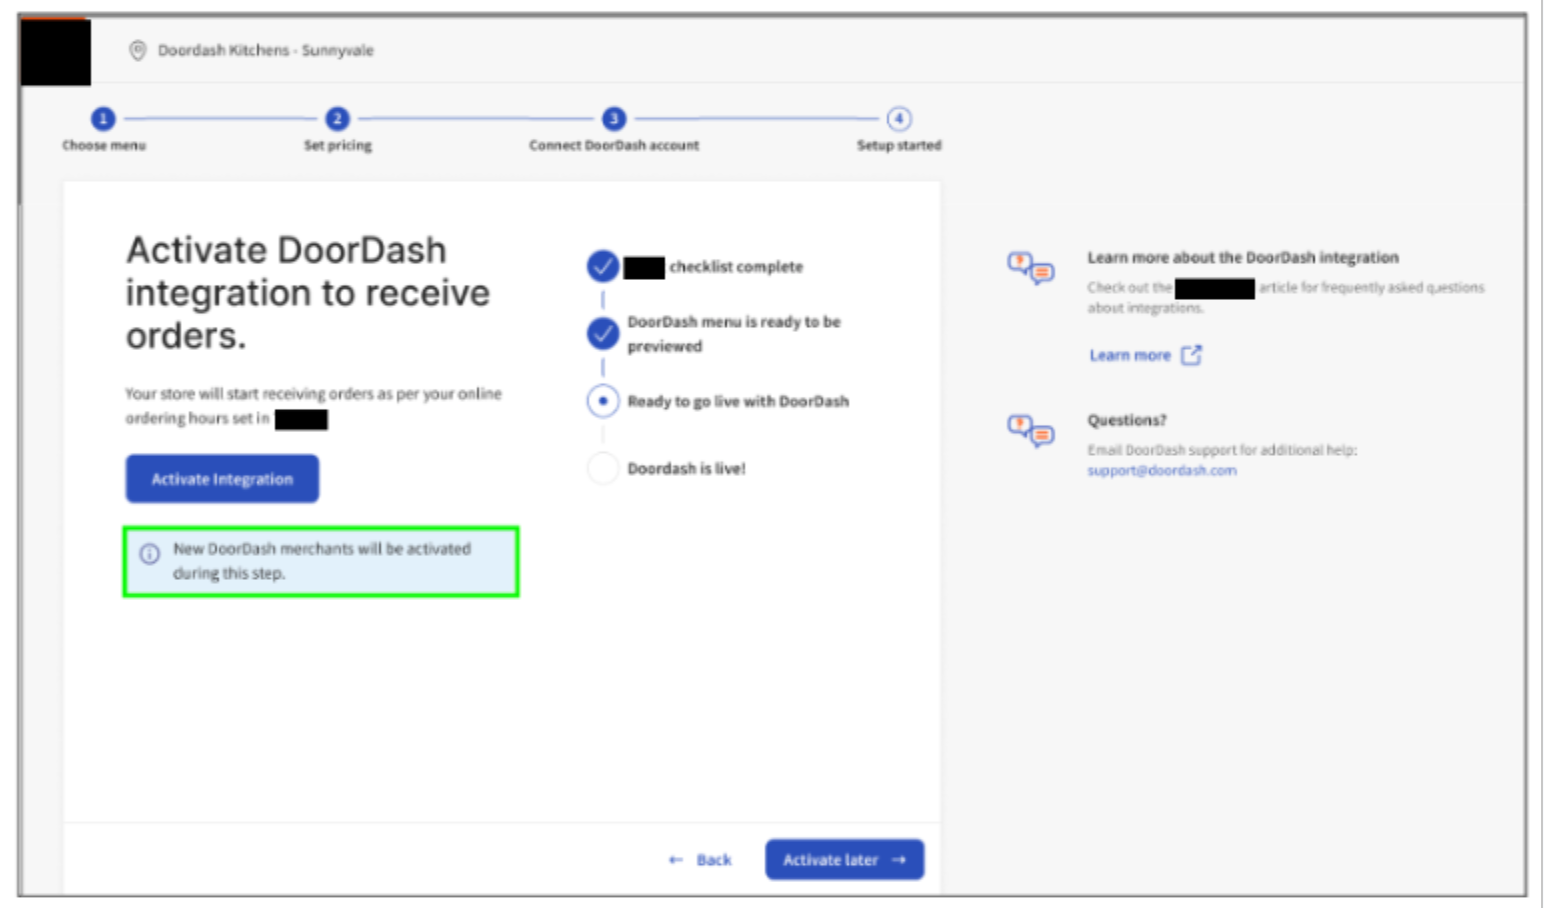
Store Activation within SSIO
The store activation within SSIO is automation within Self-Serve Integration Onboarding so that new DoorDash Merchants going through the process can activate their store more easily.
With additional automation on the DoorDash side, new Merchants will now be automatically activated within the Activate Integration workflow.
Before DoorDash can enable this change for integration partners, we request the following changes if not already supported.
Update copy within SSIO Experience to notify Merchants of store activation during integration activation step:
Within your surface to activate their integration, ensure the Merchant understands that if they’re new to DoorDash, clicking ‘Activate’ (or completing SSIO) will also result in their store being activated
Provide messaging if store activation is unsuccessful
There could be cases in which integration-activation is successful, but store activation is not. Common reasons include:
- Banking information not provided
- Store is detected as being potentially fraudulent and additional documentation is needed
In these scenarios, DoorDash will notify our integration partners via our Store Onboarding Status endpoint + webhooks using a new exclusion code (STORE_NOT_ACTIVE) and details (listed below).
{
 "onboarding_id": "9154103a-be82-48fc-978d-792171f7ee32",
 "location_id": "xdDJSnx",
 "doordash_store_uuid": "f1c7f43b-64ca-4586-b990-171aaafbca2d",
 "status": "INTEGRATION_ACTIVATED",
 "exclusion_code": "STORE_NOT_ACTIVE",
 "details": "Store could not be successfully activated, please verify details in DoorDash Merchant Portal or contact DoorDash Support.",
 "menus": [
   {
     "menu_uuid": "949e6d70-371a-4250-8fe7-2d13b141e07g",
     "menu_preview_link": "https://doordash.com/menu/1234"
   }
 ]
}
DoorDash will still provide the same response status (200) for integration activation in these circumstances.
Similar to the above requirement, DoorDash asks that you provide this detail to the Merchant in your own experience.
Ensure Merchants are able to pause DoorDash after completing SSIO.
If not already, please ensure Merchants are informed how to pause orders on DoorDash after activating themselves.
--
Store Activation within SSIO FAQ
1. Are there any additional API requests needed to support this?
This change requires no additional requests nor any new endpoints to be used. DoorDash has built this automation so that it only is triggered for Merchants that are not already active.
2. Are Merchants notified by Doordash once activated?
Yes, DoorDash will send an email to the Merchant once activated.
3. Will this automation be applied to onboarding jobs created in the Developer Portal via CSV Upload or through Store Onboarding webhooks?
No. To ensure the Merchant is one controlling their store activation, we’ve limited this automation to SSIO only.
Seamless Restarts for Integrated Onboarding
WHAT
DoorDash is adding new automation within Self-Serve Integration Onboarding so that new DoorDash Merchants going through the process can restart jobs that are currently in progress (i.e. have a status other than INTEGRATION_ACTIVATED).
Previously, DoorDash support was required to manually abandon in-progress jobs on behalf of merchants and providers so that new ones could be resubmitted without hitting a blocker.
With additional automation added on the DoorDash side, Merchants/Providers will now be able to automatically restart a job without manual DoorDash intervention.
WHY
From our integration onboarding research, a significant number of Merchants encounter this issue, blocking their onboarding. The most common scenarios where merchants need to restart integration onboarding are:
- (SSIO) Cases where the wrong location ID is specified initially
- (SOW, CSV) Cases where Menu Blockers are hit
WHO
This change will be enabled for all onboarding flows, including:
- SSIO
- Store Onboarding Webhooks
- CSV Upload
FAQ
-
Will a new onboarding UUID be generated whenever store onboarding is restarted?
- Yes
-
Are there any scenarios in which a job cannot be restarted?
- Jobs with a status of
MENU_REQUESTEDcannot be restarted until they reach a status ofMENU_BLOCKorMENU_QUALIFIED
- Jobs with a status of
-
Will we receive a notification when the previous job is abandoned?
- Store onboarding status webhooks will not be sent in scenarios where the job is abandoned due to being restarted
- The store onboarding status endpoint can still be used to verify the status of the previous job
Merchant Communication Details
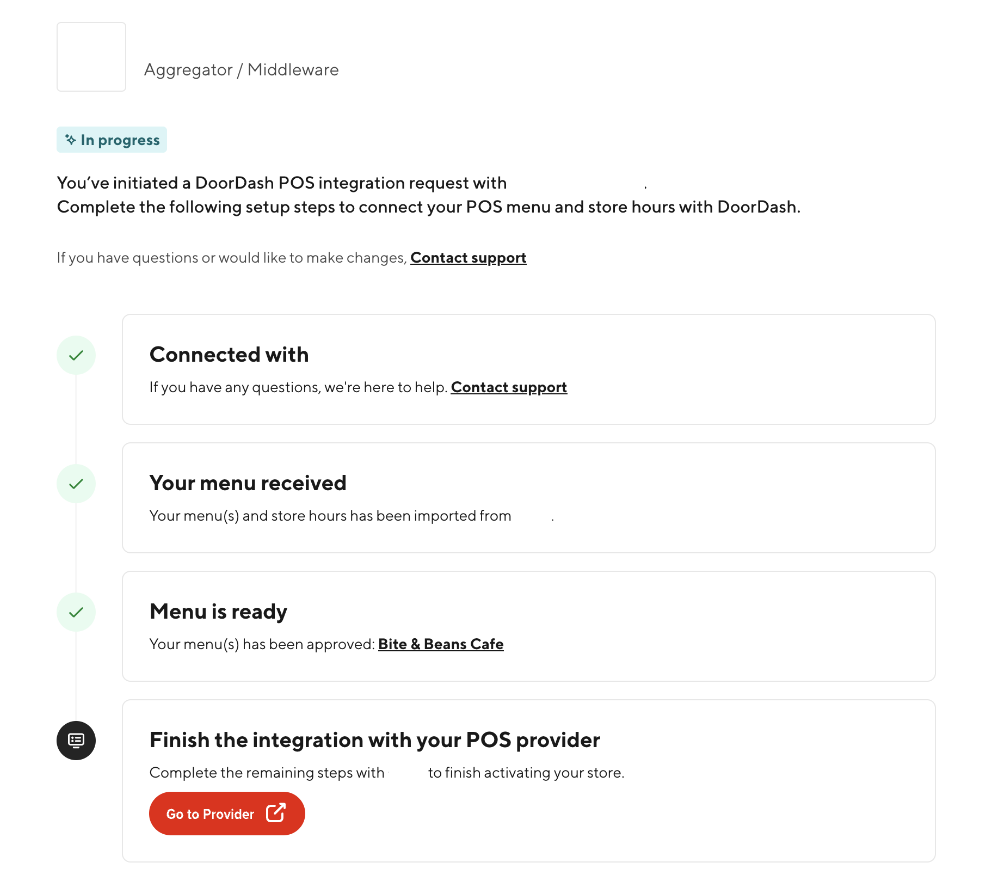
Once a merchant begins the SSIO process from the partner environment, they will receive updates to their integration onboarding progress via two methods: DoorDash Merchant Portal and automated emails.
In DoorDash Merchant Portal, the merchant will be able to see their progress through each integration onboarding milestone until the integration onboarding process is complete. If there are any errors or issues during the process, the Merchant Portal and automated emails will reflect that status.
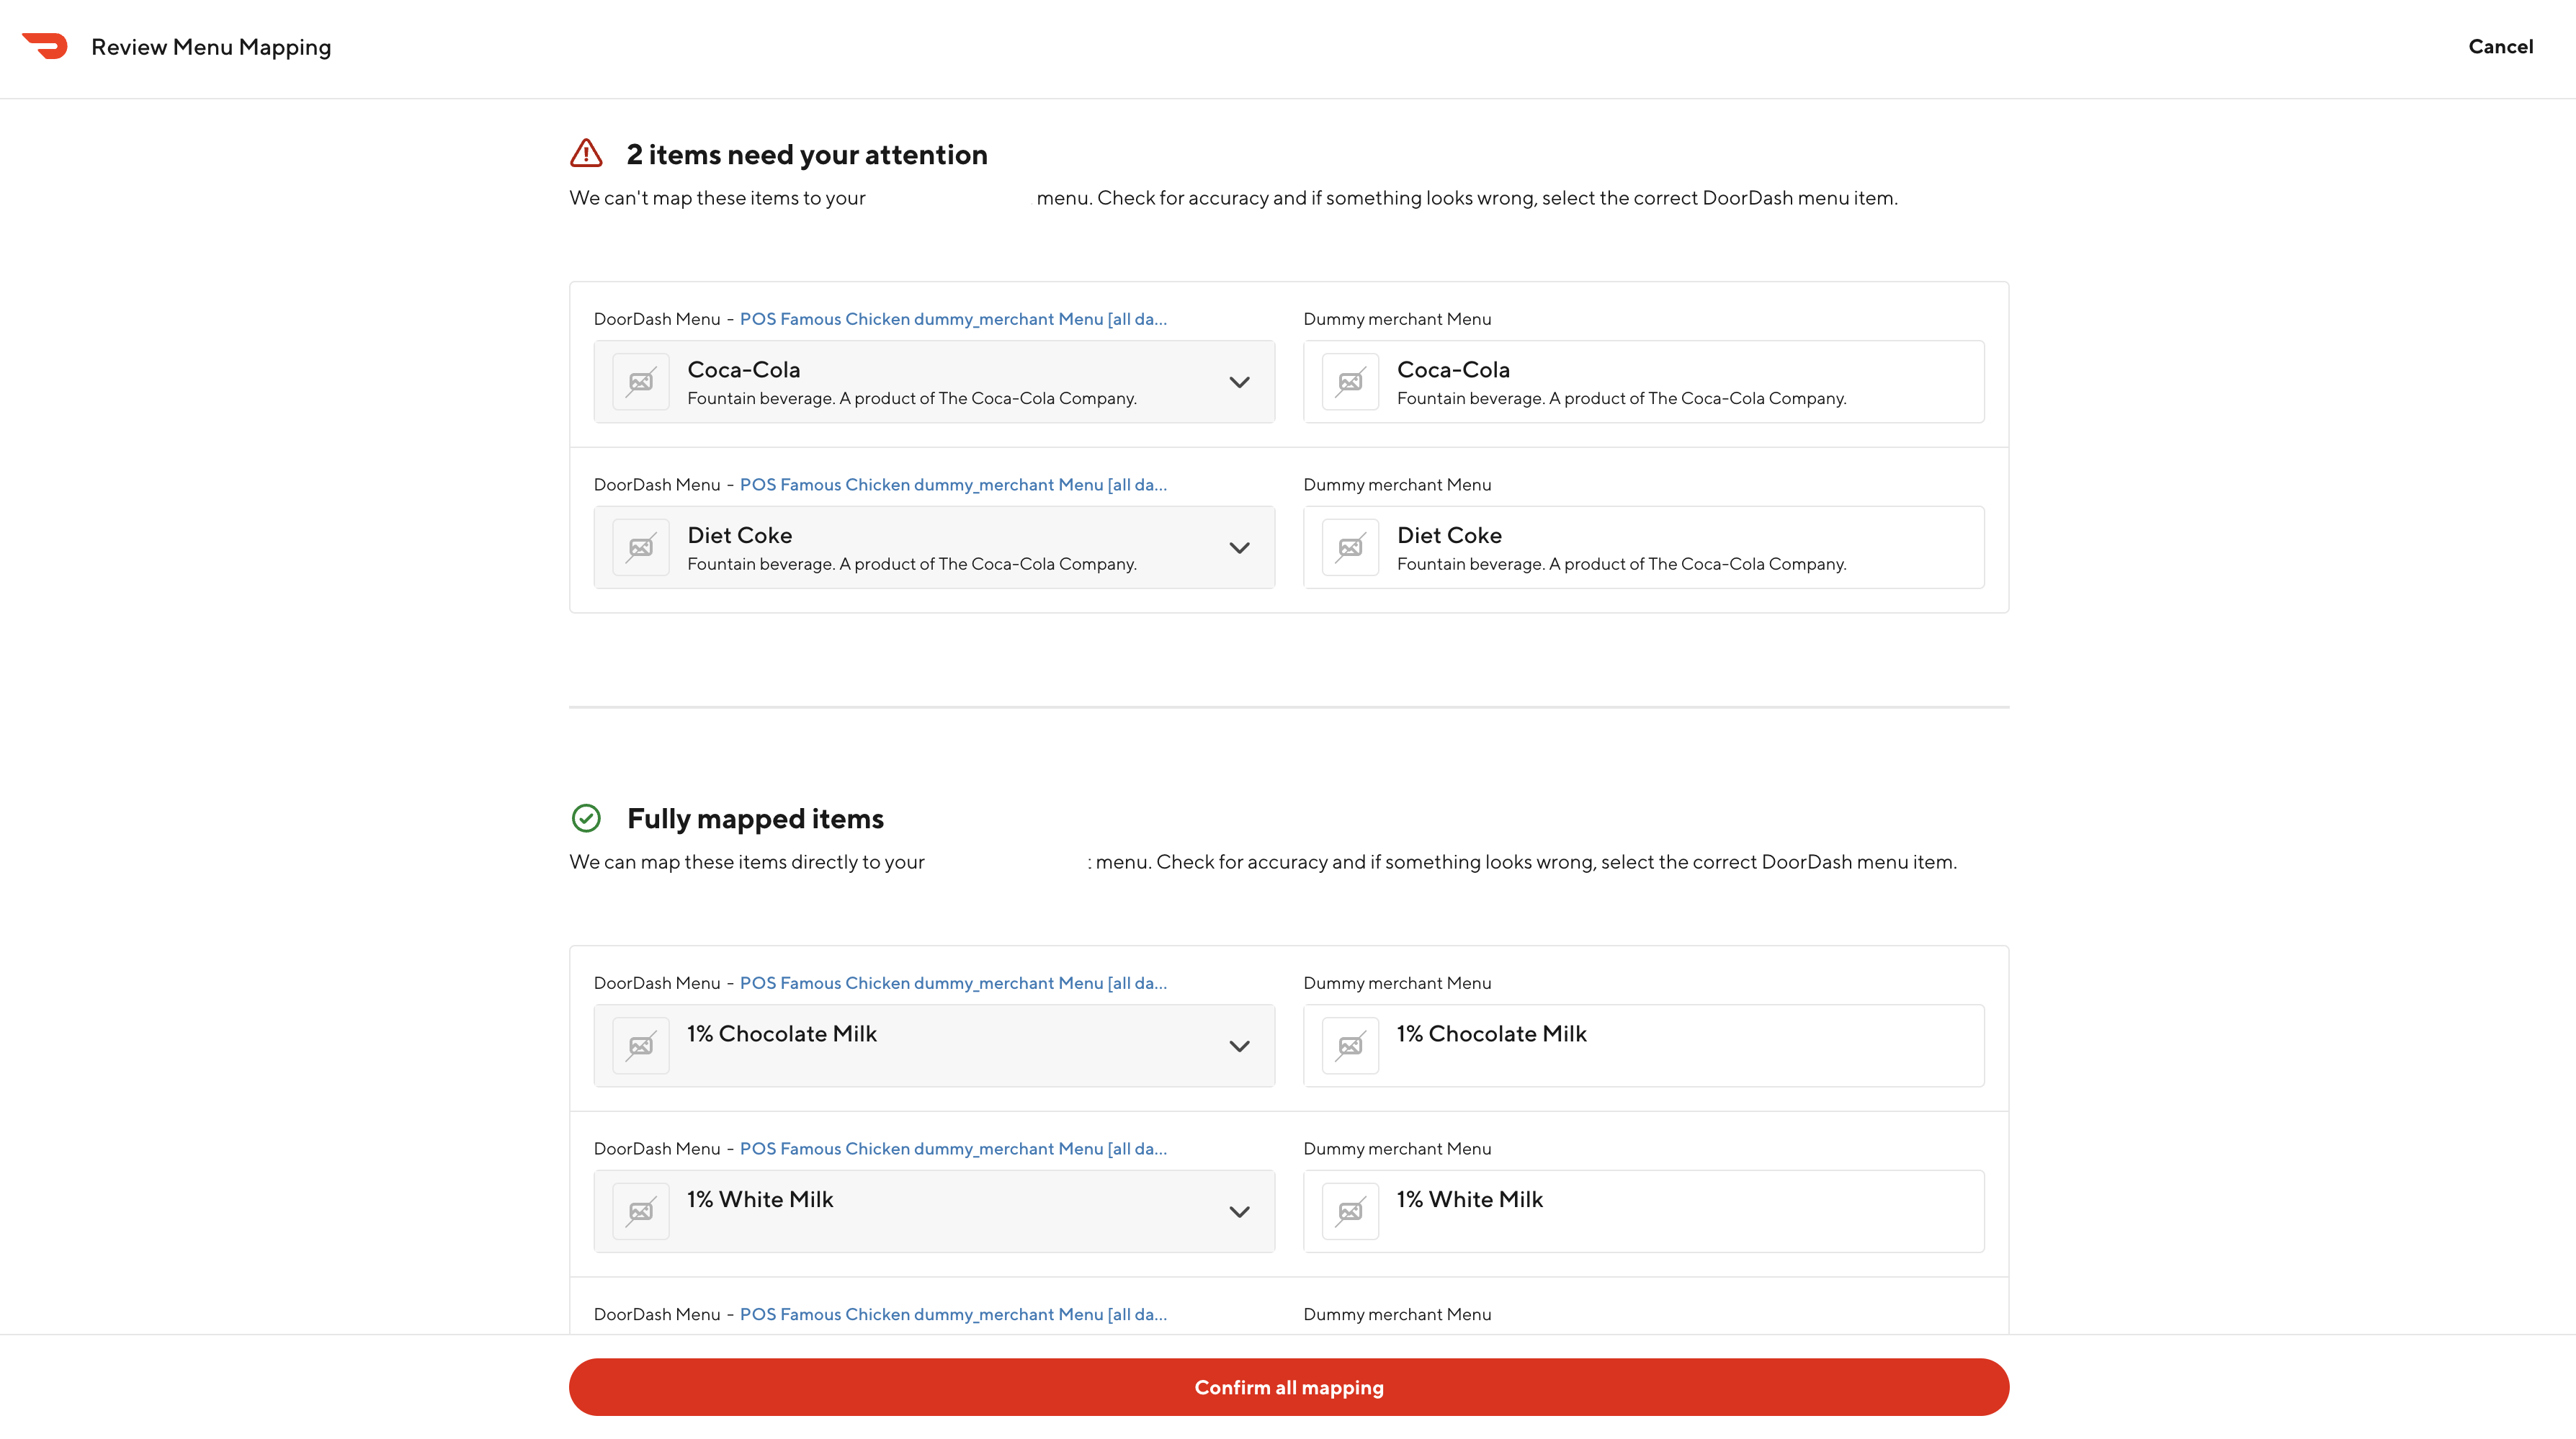
After the integration is successfully completed, merchants will also be able to map their item contents from previous menu(s) to their new integrated menu:
Additionally, merchants will receive updates on their integration onboarding progress through automated emails as well. These emails correspond to the same milestones shown in the DoorDash Merchant Portal. The merchant’s Authorized User (maintained in DoorDash) associated with their store on DoorDash will be the recipient of these emails. If a merchant does not have an Authorized User, they can contact DoorDash Support to add one.
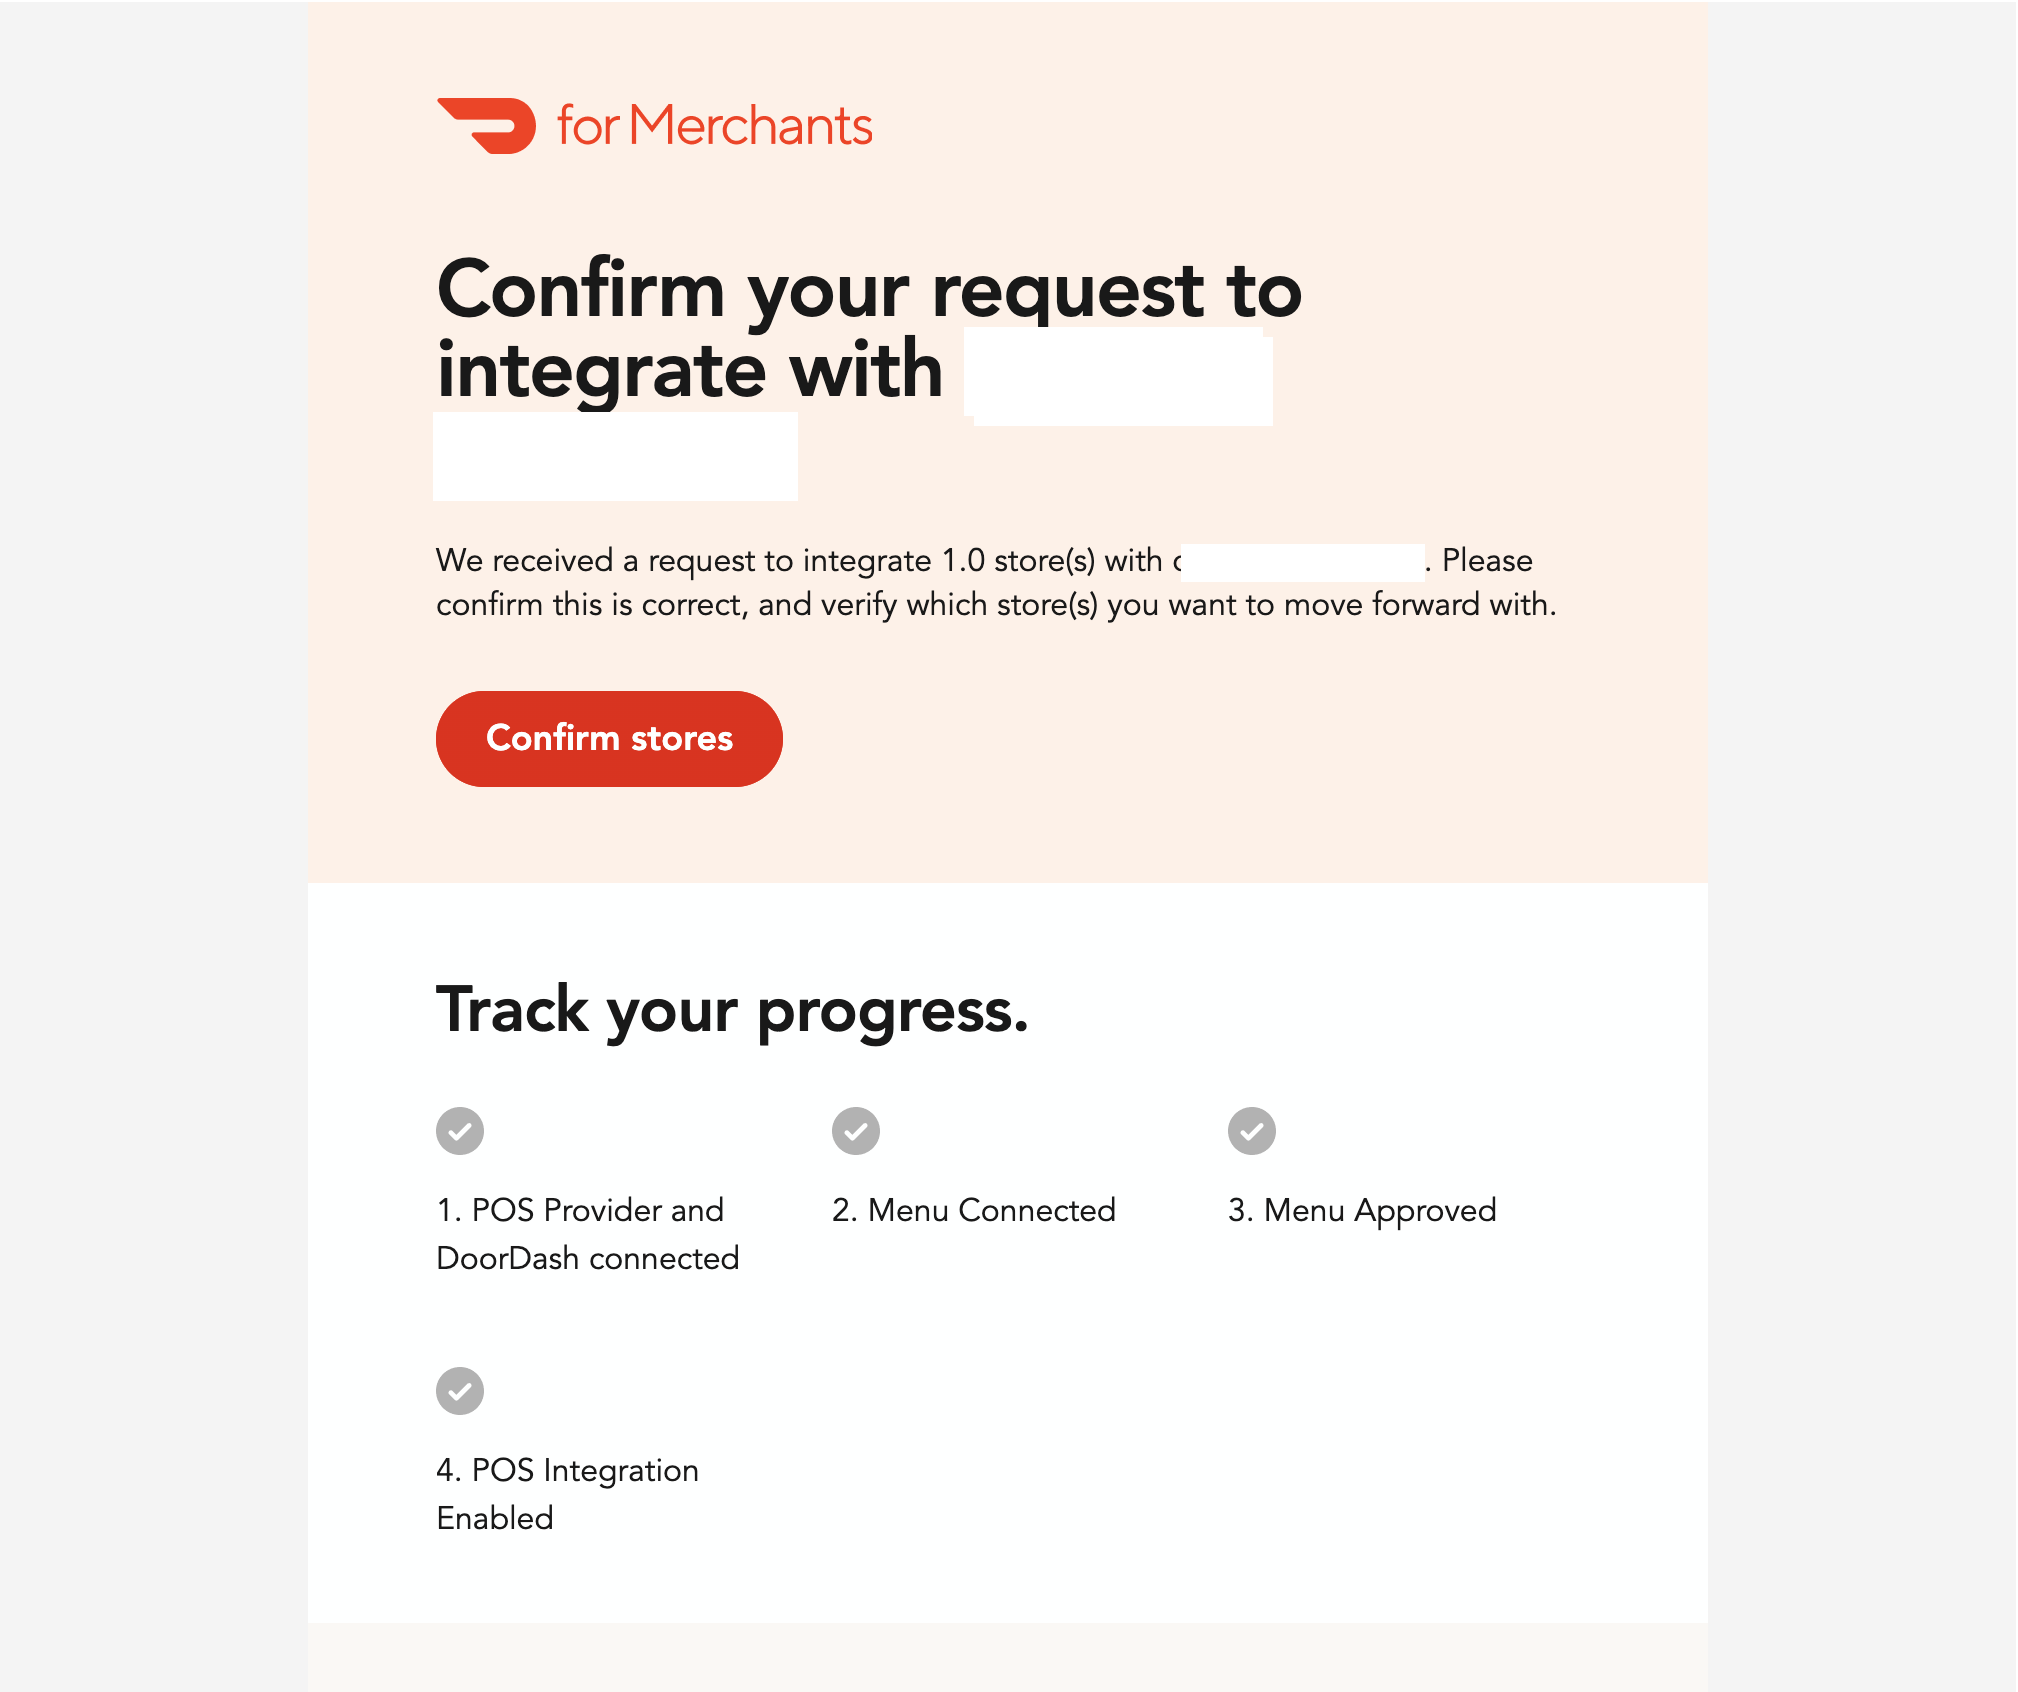
If you initiate an onboarding request via CSV Upload in Developer Portal, the merchant_decision_maker_email and the merchant’s Authorized User (maintained in DoorDash) associated with their store on DoorDash will receive an email requesting them to consent to the onboarding request initiated on their behalf. Only an Authorized User may grant this consent. If a merchant does not have an Authorized User, they can contact DoorDash Support to add one. Once consent is granted, then the DoorDash Merchant Portal milestones and automated emails will behave in the same manner as if the request was initiated via SSIO rather than CSV Upload.
CSV Upload Details
The SSIO architecture is built in such a way that each store is onboarded on a store-by-store basis in its current state. This provides a sub-optimal experience for merchants onboarding many locations at once. To ensure the best merchant experience is provided, we recommend providing a way for merchants to map multiple locations within the partner environment to the DoorDash stores returned in the Fetch DoorDash Stores response in a single batch. Understanding that every partner is different and you may not be able to accommodate such a user experience, we also offer our partners an alternative method to onboard merchants to any integration if you are onboarding many locations in one batch. This approach should ONLY be used if you do not build a sufficient multi-location batching experience and a merchant has too many locations to oAuth each one individually. If you are looking for inspiration on what an end-to-end SSIO implementation might look like according to DoorDash certification requirements, please see our white-label implementation example here.
-
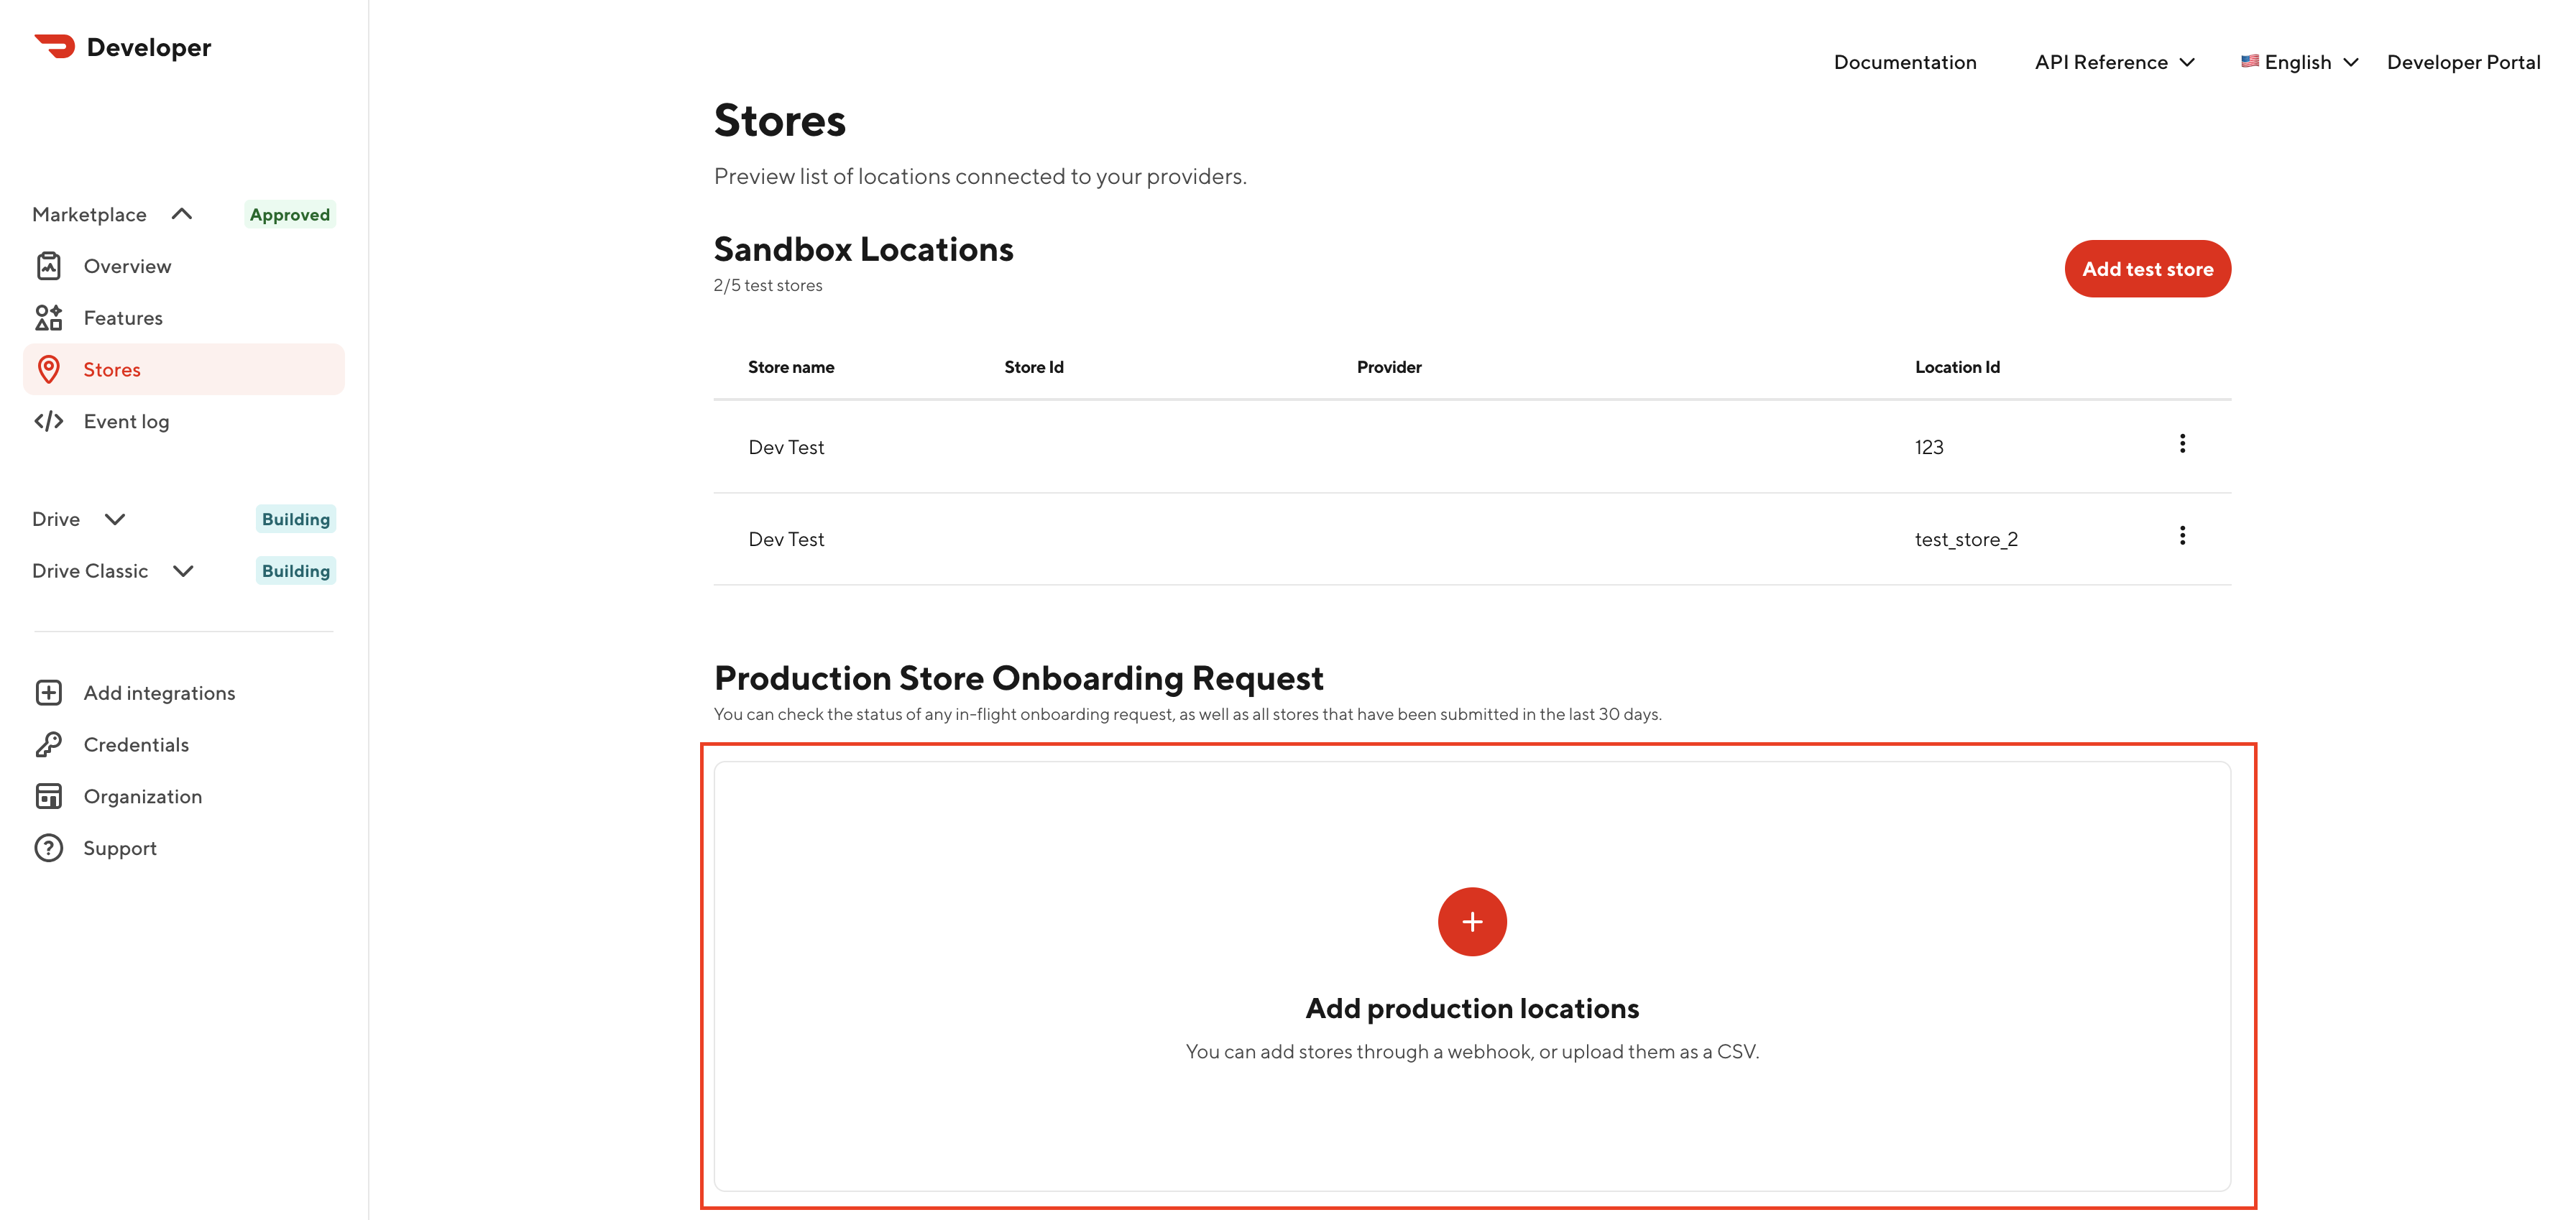
Partner must log into DoorDash Developer Portal > Stores page.
- Note: As indicated in the prerequisite Developer Portal Sign up, partners must be signed up for Developer Portal. If you have not done so already, please follow the steps detailed here to complete the migration.
-
Partner must upload a valid CSV with the locations' details included. Note that any user belonging to your organization may utilize this CSV Upload functionality.
-
DoorDash utilizes internal address matching logic to identify the DoorDash Store ID corresponding to the merchant request. (this is done regardless of if the DoorDash Store ID is specified in the CSV).
-
Once approved, DoorDash will fire Onboarding Status webhooks to you with an Onboarding ID for these locations. You must be prepared to listen to these webhooks as at that point, the merchant should be able to continue through the standard SSIO flow having bypassed the oAuth and store selection steps.
-
On the DoorDash Developer Portal, a provider will be able to see which Merchant store has been requested and waiting for pending confirmation. If the user did not confirm the store, the activation status will change to integration abandoned.
CSV Details
| Name | Type | Required? | Details |
|---|---|---|---|
| partner_store_id | string | true | Unique identifier of the store in the partner's system |
| doordash_store_id | string | false | Unique identifier of the store in the DoorDash's system. If you don't know this value, please omit it. DoorDash will validate the correct Store ID based on name/address regardless of if this value is provided. |
| partner_store_name | string | false | Customer-facing name of the store (e.g., “Burger Shack”) |
| provider_type | string | true | Used to indicate the partner with which the store is associated (see Provider Type explanation) |
| address_line_1 | string | true | Merchant address field |
| address_line_2 | string | false | Merchant address field |
| address_city | string | true | Merchant address field |
| address_state | string | true | Merchant address field |
| address_country | string | true | Merchant address field |
| address_zip | string | true | Merchant address field |
| requestor_first_name | string | true | First name of the partner point of contact (who can resolve issues) |
| requestor_last_name | string | true | Last name of the partner point of contact (who can resolve issues) |
| requestor_email | string | true | Email of the partner point of contact (who can resolve issues) |
| expected_go_live_date | string | false | Partners to indicate an expected date to go live. If this value is not provided, the store will be onboarded as the DoorDash Activations specialist processes the request. If provided, the DoorDash activations team will attempt to honor the date, however, timelines can be delayed owing to issues on the Partner / Merchant’s end. |
| mx_decision_maker_email | string | true | Email contact for user on the merchant’s side initiating the request as well as for receiving status updates on the onboarding request |
Prerequisites & Other Requirements
[Prerequisite] Developer Portal Sign Up & Technical Migration
To enhance our partner experience, DoorDash has launched a DoorDash Developer Portal. The Developer Portal allows partners to manage their integration, view integration metrics, integrated store information, and more. With regards to SSIO, partners can also use Developer Portal as a last resort to onboard merchants with many locations so they do not have to go through SSIO on a location-by-location basis (e.g. one by one) in the event where you do not build a multi-location batching experience (note: this feature is coming soon). Before launching SSIO, you must sign up for Developer Portal to support onboarding merchants with many locations in case multi-location batching is not built. If you are not signed up for Developer Portal you will not pass SSIO certification due to the poor resultant merchant experience when onboarding a large number of stores to the integration. Please note there are different steps required depending on if you already have an account in Developer Portal for DoorDash Drive.
[Prerequisite] Menu Pull
You are required to build Menu Pull capability as part of the DoorDash integration. This ensures a consistent experience for the merchant and ensures there is an optimal rescue path for any escalated cases needing manual action by DoorDash.
[Requirement] Integration Transitioning Merchants
We are allowing merchants to self-serve switching their DoorDash store from another POS provider to yours. This means that the Fetch DoorDash Stores response may include stores which are already active on a different integration. These stores will not have any indication if they are active on a different integration. Once the merchant completes the SSIO flow through your environment, their previous integration will no longer work. The merchant should work directly with their previous POS provider to cancel any services as needed. Partners must include some verbiage in the SSIO flow UI that any previous integration will be broken once they activate themselves on your integration.
[Requirement] Ingest New Onboarding ID
There are two scenarios where a new onboarding_id value will be generated without the partner having called the Initialize Onboarding endpoint.
- When a merchant signs up on DoorDash through the redirect_url generated via the Net New API, an onboarding_id will be generated at the end of the merchant | DoorDash sign up flow. The partner needs to listen to webhooks for the location_id specified in the Net New API request so that the merchant can resume the flow when they return to the partner environment.
- When a merchant enters an Onboarding Status of ABANDONED, they will usually work with DoorDash to resolve the blocking issue. In this scenario, DoorDash will resolve the issue and then "retry" the onboarding case using internal systems. When this retry occurs, a new onboarding_id will be created. Partners must ensure they are listening to webhooks for that location_id accounting for the possibility of a new onboarding_id being generated.
It is safe to assume that if DoorDash sends an Onboarding Status Webhook with a new onboarding_id, you should use that new onboarding_id as the source of truth.
[Requirement] Partner Environment URL
For merchants signing up on DoorDash as a net new merchant, we will be directing them to the partner's portal to go through SSIO to finish their onboarding process to DoorDash. Therefore, partners are required to provide a URL to their environment for where merchants can start or continue the SSIO process.
[Requirement] SSIO Restart
After a merchant starts SSIO and/or successfully finishes SSIO, they should be able to return to the beginnning and do it again if they so choose. This functionality is to ensure that merchants going through a Change of Ownership or who onboard the wrong store through SSIO have a way to bind their Location ID in the partner environment to the new or correct DoorDash store. This will also support the use-case if your locattion_id is changing and you need to update the currently integrated store's location_id.
[Requirement] Partner-created Help Article
Since the SSIO flow is managed by the partner, DoorDash expects our partners to serve as first line of support for merchants who are having issues with the SSIO flow. However, if any issue requires the help of DoorDash to resolve, please work with [DoorDash Support] (https://developer.doordash.com/en-US/docs/marketplace/how_to/request_support) as you normally would for other merchant integration issues. We require an SSIO help doc which details the step-by-step process for completing the SSIO integration. Expectations of what this partner-created help document should cover are detailed here.
- As the help article will be accessed by merchants as well as DoorDash support representatives, the article must be publicly accessible via a direct URL (cannot require a login to access)
- The help article must be formatted as either a web page (strongly preferred) or PDF document accessible in a web browser
- The help article must be hosted and maintained by the partner
[FYI] Virtual Brands
If merchants in your partner ecosystem have unique location_id values for each virtual concept they have, those merchants can seamlessly integrate their virtual concepts through SSIO just as any other store would. However, if merchants in your partner ecosystem do NOT have unique location_id values for each virtual concept they have, we will block those virtual concepts from onboarding through SSIO since DoorDash does not support having multiple stores sharing the same provider_type / location_id combination.
[FYI] Staff Tips
If your integration does not support Staff Tips (merchant_tip_amount), merchants going through SSIO who previously had Staff Tips enabled will automatically have this functionality disabled when they activate themselves on your integration - this is to prevent the risk of failed orders. We recommend supporting this feature to avoid a disruption in the merchant experience. Please contact your Technical Account Manager if you build this feature to ensure you are included in our allowlist.
[FYI] Launch Timeline
Once you have passed all certification critera, you may enable production SSIO volume at 100%. Alternatively, you may scale SSIO production volume up gradually, but you must have 100% production volume through SSIO within 4 weeks of your first enablement increment. In other words, once you enable any number of merchants through your production SSIO, you have 4 weeks to scale to 100%. After 4 weeks, DoorDash will deprecate your legacy onboarding method and only onboarding requests sent through SSIO will be honored.
Partner Build Details
What Do Partners Need to Get Started?
When you are ready to start building SSIO, DoorDash will provide you with a few different resources to help you get started.
DoorDash Provides the Following to Partners:
- oAuth URL - use this URL to login with your dedicated authorized test user (DoorDash will ask which emails you want setup on your test stores for this).
- oAuth client - this will be included in the oAuth URL.
- DoorDash Test Business + Test Stores - you will have 5 dedicated SSIO test stores created for you to build and test your SSIO logic. Some stores will be created in an "ineligible to onboard" state so you can validate your handling of these stores. We will need to know what email to use as the "Authorized User" for these stores, as well as another email to use as a "Store Operator" user so you can reproduce the "user does not have business admin access to all stores" error.
- Postman collection - you can find this here. You can use this collection once you have successfully oAuth'd using your oAuth URL.
- Postman video walkthrough - you can find this here. You can see how the APIs are expected to be used to get started building.
- E2E Flowchart (High-level + Detaliled flows) - you can find this here. You can see the E2E merchant journey going through SSIO APIs and expected milestones.
- White-label SSIO implementation example - if you are looking for inspiration on what an end-to-end SSIO implementation might look like according to DoorDash certification requirements, please see our white-label implementation example here.
Partner Provides the Following to DoorDash:
- User emails - we will need 1 Authorized User email (this will be used to oAuth and fetch stores) and 1 Store Operator email (this will be used to test an inadequate permissions error).
- Redirect URL - this is the URL which merchants should be redirected to back to your environment after completing oAuth. The redirect URL used in your application must have the same scheme, authority, and prefix as the redirect URL allowlisted by DoorDash (definitions). This means if you allowlist
https://yoururl.com, you could use redirect URLs such ashttps://yoururl.com/some_value,https://yoururl.com/some_value/some_other_value, etc. However, using a different prefix such ashttps://somevalue.yoururl.comwill not work. - Terms & Conditions - this is the URL where we can find your Terms & Conditions - it will be shown to merchants on your partner-specific identity page (where merchants grant consent). If you are in multiple regions, this needs to be 1 single URL for all locales.
- Privacy Policy - this is the URL where we can find your Privacy Policy - it will be shown to merchants on your partner-specific identity page (where merchants grant consent). If you are in multiple regions, this needs to be 1 single URL for all locales.
- Partner starting URL - this is where merchants can sign in or sign up for your service (e.g. where merchants go to login to your control center, dashboard, web portal, etc.).
Reset Onboarding API (Testing Only)
To help streamline your build/testing, we offer an API to reset the onboarding_status of a given onboarding_id. This API is NOT available for production use. It should ONLY be used for testing. It will NOT work for production onboarding_id values
Request Endpoint:
"request": {
  "method": "DELETE",
  "header": [
    {
      "key": "Authorization",
      "value": "Bearer <Partner JWT>",
      "type": "text"
    }
  ],
  "url": "https://openapi.doordash.com/marketplace/api/v2/store_onboarding/<onboarding_id>",
  "protocol": "https"
}
Certification Details
E2E Test Store Activation Proof of Concept
When SSIO is considered dev-complete, please coordinate with your Technical Account Manager to schedule a live certification (certification tracker) and review of your implementation of SSIO along with your merchant-facing enablement material. This will help ensure the API best practices are being followed, you are not missing any critical piece of the process, and help empower our internal teams with context around how it works in your environment.
Terminology
-
POS
- Point of Sale order protocol
-
Merchant (Mx)
- The restaurant or brand fulfilling orders on DoorDash Marketplace. The user when applicable in SSIO should be the authorized user for a business on DoorDash. The authorized user will already have a DoorDash Merchant Portal permission set and will therefore be able to proceed with any necessary actions required
-
Partner/Provider (Px)
- For DoorDash to reach the merchant's Point of Sale system in the store, we integrate with POS providers/"partners". Providers/Partners integrate with DoorDash by sending a menu from their environment and receiving orders from DoorDash, sent directly to the in-store POS. For SSIO purposes, the merchant should have an active account on the POS provider side
-
Provider Portal
- The POS provider has its own portal to manage the status of the store on the POS provider side. The onboarding process should happen on the provider/partner portal instead of the DoorDash portal
-
Merchant JWT
- The JWT token obtained after the merchant successfully OAuth connects to DoorDash
- This token will be used to fetch the DoorDash store information for the merchant
-
Partner JWT
- The JWT token provider used to authenticate the calls to DoorDash
Specification Updates
| Release | Notes |
|---|---|
| 1.2 (current) | Add optional first_name and last_name fields to Net New API |
| 1.1 | Add MxAuthorization header to /store_onboarding endpoint |
| 1.0 | Soft launch SSIO spec |